
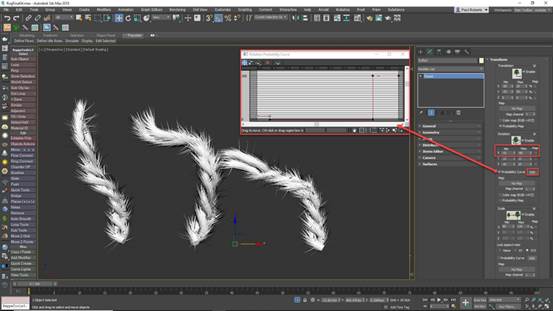
Adding “Hair” with Forest Pack
Change the mode in the Surface rollout to UV and drag the direction slider to 0. In the Distribution rollout, change the map to Solid, uncheck the Lock Aspect Ratio option and then adjust the X and Y Density size to add more hairs. Adjust the rotation of the hairs from the Transform panel so that they follow the length of the threads. To add flyaway hairs, increase the X Rotation Max value, Enable Probability Curve and change the graph so that there is a high probability of hairs following the thread and much lower probability of flyaway hairs.
Update the patches
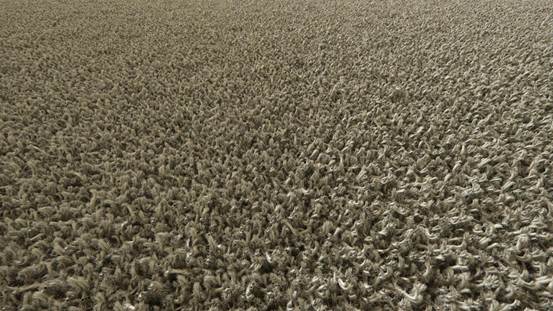
Duplicate the Forest Pack object to do the same thing for the other threads. Make sure that the pivot point is at the bottom of the threads and then choose the patch object. Update the objects in the Items List to the new high-detail threads. Remember the patch is nested in the main rug object, so the changes cascade through and it is updated automatically. If you move the camera close to the rug and render, you should find that the new detailed geometry stands up much better.
Other Fabrics
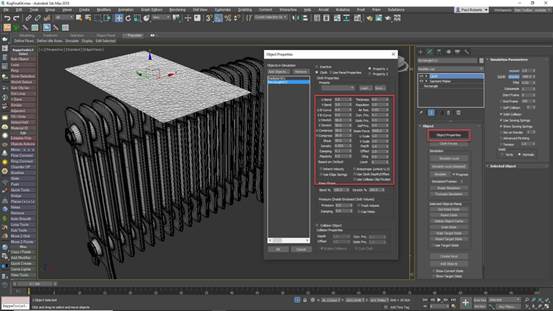
This technique works well for rugs, but it’s equally useful for any other fabric with a long pile. To finish this tutorial let’s look at another example that uses the same technique to add a towel on the radiator. Start by isolating the radiator and drawing a rectangular spline above it the size of the towel. Add a garment modifier and increase the Density value so that there’s sufficient resolution for smooth deformation. Add a Cloth modifier. Open the Object Properties and change the towel to a cloth object. Add the radiator as a collision object.
Cloth sim the towel
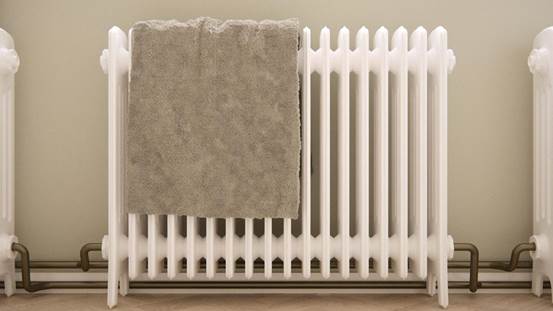
Rotate the towel before starting the simulation so that it lands on its edge. This will create more interesting wrinkles than letting it land flat. Click on Simulate Local and… wait. The detail in the radiator geometry can mean that it takes a while to simulate. Once you’re happy with the towel, add a Turbosmooth modifier to smooth out the folds. Unlike the rug, you probably don’t want this mesh to be visible so open the object’s properties and deselect the Renderable checkbox. We can now add clumps of fur.

Add fabric tufts with Forest Pack
Add a small clump of tufts to a new Forest Pack object and then add the towel mesh to the Surfaces list. Change the mode to UV and the Direction to 0 so that the items are distributed across the surface. Change the Distribution map to Full and adjust the density until the patches overlap by about 25%. Randomise the Z Rotation and the Scale to disguise repetition and hit render. You now have a towel with tufts of fabric. Many more types of soft furnishing can be created using these techniques, so experiment and have fun!
Quick Tip 1 - Simulate cloth in Marvellous designer
In this tutorial we’re using 3ds Max’s built-in cloth simulator, but if you have it, Marvelous Designer is a much more fully featured and faster cloth simulator that’s great for quickly creating base geometry for rugs.
Quick Tip 2 - Creating Patch Variations
In this tutorial we created patches using simple twisted splines, but many more styles of rug are possible by creating patches from different source geometry.
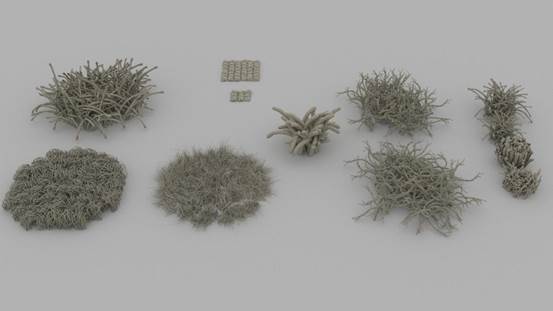
Quick Tip 3 - Modelling Clumps with GrowFX
GrowFX is a really flexible plant modelling tool for 3ds Max, but it’s also great for modelling all kinds of other objects including patches of fabric that can be scattered with Forest Pack to create rugs and carpets
Quick Tip 4 - Round off the ends of splines
If you’re creating threads from splines in Max 2019, try out the new Quad Caps mode in the Render Spline modifier. It allows you to automatically add a domed cap to the ends so that you avoid the unnatural flat cap effect seen in previous versions.


© Copyright 2000-2026 COGITO SOFTWARE CO.,LTD. All rights reserved. 京ICP备09015132号-52