Corona Renderer
Features
Corona Renderer delivers high quality, physically-based shading in production rendering.
All its features are tightly integrated into Autodesk 3ds Max.
Ease Of Use
No–one calls themselves a “3D Technician” – everyone rightly calls themselves a 3D artist, and that means your tools should be as close to invisible as possible so they don’t get in the way of your creativity.

Corona Renderer is one of the easiest to learn render engines. Its setup really is as simple as pressing “Render”! Most new users will learn Corona Renderer in just one day, and fall in love with it over the next few.
Easy to Understand
Our mission with Corona Renderer is to liberate users from technical and unnatural processes. We are constantly trying to simplify the creative process by removing or hiding any unnecessary technical settings, so that artists can focus on their vision. The era of studying manuals and tweaking sampling is over. Just press render and let Corona do its magic.

Artist Friendly
Corona Renderer is developed in tight cooperation with the artist community. Its creators are former artists as well, so this collective knowledge and experience plays a huge role in the design and on–going development.
Don’t just take our word for it though. Here’s Peter Guthrie and Henry Goss from The Boundary:
And Iain Banks and Alex York from Recent Spaces have something to say about Corona Renderer’s ease of use too:
Use the Tools you Like
Corona Renderer is compatible with a huge range of third-party plugins, so you can continue to use any tools you already have integrated into your workflow - whether you are using Corona's Interactive Rendering or doing a final render, you can keep right on using iToo’s Forest Pack and RailClone, Siger Shaders, Quixel Megascans, Allegorithmic Substance, Phoenix FD, FumeFX, Ornatrix, Hair Farm, and many more.

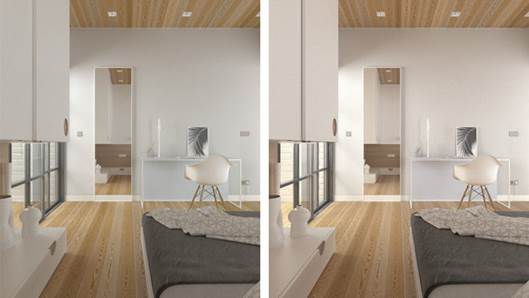
Corona Renderer is also compatible with the core V–Ray Materials and V–Ray Lights, which allows you to render those using Corona even if V–Ray is not installed. This is ideal for downloading V–Ray assets from model stores, or if you already have a library of assets in V–Ray format, or if you are studio using both engines, and so on. Below is a V–Ray scene rendered in V–Ray and in Corona – can you tell which is which?
Whether this is your first time adding a new renderer, or you are already a pro who has used many different engines, you’ll find Corona Renderer’s ease of use to be refreshing!
Rendering Quality
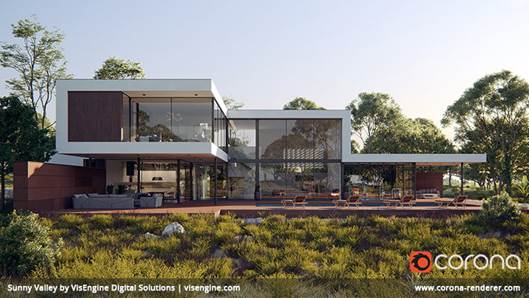
Corona Renderer delivers predictable, reliable, and physically plausible results with no compromises in quality. Realistic lighting and materials are yours right out of the box.
Our Forum and Gallery section provide great examples of the quality that Corona Renderer can produce. If you want to know more about the technology behind it, read on!
Caustics
New in Corona Renderer 4, the Fast Caustics Solver lets you easily add caustics to your scene. Once enabled, reflective caustics are calculated automatically for all materials in the scene. You can then enable refractive Caustics per material.
For further control, you can choose to disable caustics for individual Corona Lights, and render caustics to their own Render Element for manipulation in post processing
Biased and Unbiased Rendering
Corona Renderer offers both biased and unbiased rendering solutions.
By default, Corona Renderer uses a slightly biased solution, very close to being unbiased but considerably reducing render times. This is the recommended solution and works without you having to do any setup whatsoever. Corona Renderer will always deliver crisp, realistic results without splotches, interpolation artifacts or any other visual imperfections.

UHD Cache
Traditionally, you had to choose between using unbiased algorithms with no caching and accept long render times, or using biased caching algorithms and deal with splotches, missing shadows, and sensitive input parameters. Corona Renderer merges the best of both worlds – the UHD cache is significantly faster than plain path tracing, but does not suffer from artifacts, missing contact shadows, or complicated UI controls.
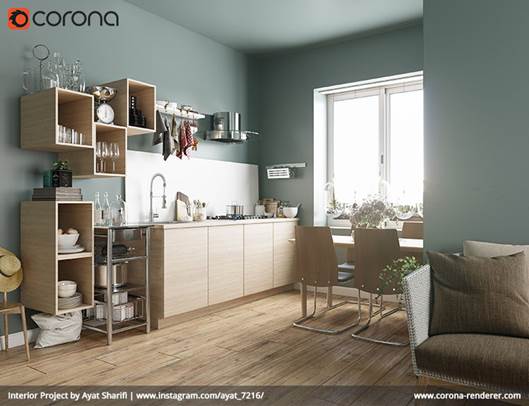
The UHD cache uses only partial caching, so does not try to interpolate everything. While this is slower than a fully cached solution (such as irradiance caching), it does not create artifacts, only noise that eventually goes away.
The UHD cache is an ideal solution for animation, and significantly reduces flickering even when light sources or geometry are moving. This is especially important when the cache cannot be precomputed.
Speed & Interactivity
Speed is an important factor in any production environment, and a renderer must always deliver results as fast as possible.

As a result, we are obsessed with speed! We like to hunt for milliseconds in our own code, and are always looking for ways to cut down parsing and rendering times without forcing users to buy expensive hardware, by focusing on creating smart algorithms under the hood. In every version we release, we look to boost the speed of rendering as much as possible as well as adding new features.
Corona Renderer uses Intel Embree Ray Tracing Kernels, making the CPU–only Corona as fast as many GPU renderers but without any of the limitations of GPU–based solutions…
Denoising
The denoising feature analyzes noise in the 3D space, so is not just a 2D post–process. You can use it to reduce the number of passes needed to get a noise–free image, with render time reductions of 50 to 70% reported to us by third parties in commercial usage (not in carefully crafted test scenes!). It will also remove fireflies (hot pixels) from an image, and can be used only in that mode if required.
Denoising is seamlessly integrated into the core as a one–click solution. The denoising level can be interactively adjusted in the VFB after rendering is complete, so that you are not locked in to the level set in the rendering options. This lets you check and adjust the blending between the regular and the denoised image without having to re–render. You can also calculate Denoising in the Corona Image Editor rather than at render time and without the overhead of working in a 3D application.
To learn more about it, you can watch the tutorial from when Denoising was released:
Interactive Rendering
Corona Renderer aims to make you faster as well as your renders, with a workflow that is second–to–none. Thanks to its fully–featured Interactive Rendering, Corona Renderer brings you all the same advantages as a GPU render engine but without any of the drawbacks and limitations.
You can change materials, lights, and create or adjust geometry and see your interactive render respond almost immediately. It runs completely on the CPU, so it has no limitations and won’t care what graphics card you have installed.
NVIDIA GPU Denoising
The NVIDIA OptiX denoiser is the only denoiser which you can use during Interactive Rendering, and gives you a noise–free image in record time.
You aren’t limited to using it only for interactive rendering however – you can also use the GPU denoiser for final renders too if you choose.
Note that this denoiser requires a compatible NVIDIA graphics card. Standard denoising uses the CPU only so can be used with any graphics card.
Intel AI Denoising
This AI denoiser for final renders offers a balance between quality and speed. It is purely CPU–based so you can use it whichever graphics card you have, and it runs on any CPU (not just Intel).
What You See Is What You Get
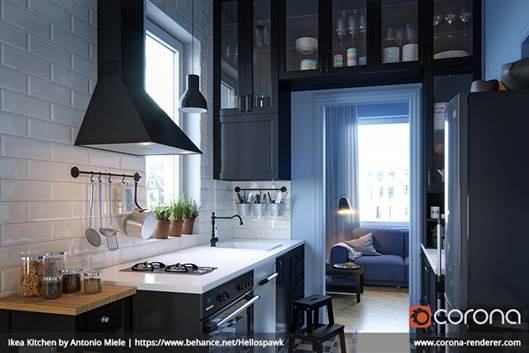
Our interactive rendering is an integral part of the Corona core and shares over 99.9% of the regular renderer code. This means that all features of Corona Renderer are supported, and that the results are exactly the same as your final render – you can render motion blur, DOF, create proxies, scatter systems and more, all with instant feedback.
Compatibility
Because our interactive and regular renderer are almost identical, all types of geometry and proxies are supported, as are almost all 3ds Max maps and third party maps. Even advanced third party plugins, such as Itoo Forest Pack, hair and fur from Ornatrix and Hair Farm, simulations from Phoenix FD and FumeFX are supported. You can find a full list of supported plugins in the Resources section.
Core V–Ray Lights and Materials will also work in Interactive Rendering, even if V–Ray is not installed. Check out which V–Ray features are supported – and support will be growing in the future.

Interactive Rendering also offers as many render regions as you like, which can be moved and resized as you choose. This means that so that they can act as a “sample brush”, letting you paint–in areas which you want to refine faster or inspect at better quality.
Efficient Handling of Many Lights
Corona handles scenes with many lights without problems and with no penalty to render time, so that you don’t have to worry about trying to optimize your scene.
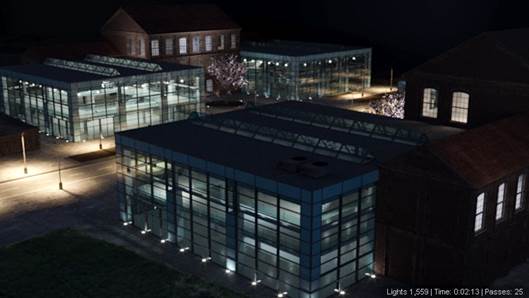
Adaptive Image Sampling
This balances out the rendering calculations over the image to focus more processing power on tricky areas like shadows. By keeping noise more evenly distributed, this gives a usable image more quickly, and also allows Denoising to work its magic. Coupled with the new High Quality Image Filtering introduced in Corona Renderer 4, which gives a much more natural and less CGI look to the noise, and your images will be noise–free faster than ever!
Affordability
We had the luxury of being able to do things differently right from the start, and we took advantage of that not only in development but also when creating our licensing plans.
We have two simple goals:

The Global Reach of Corona Renderer
Corona is actively used in 143 countries around the world, and that means the average wage for our users can differ by a factor of 20. Even with today’s internet, most CG artists work for local customers, and that means at local prices.
We want to offer our product to the broadest audience around the globe for a fair price that would suit everyone. Traditional perpetual license models don’t fit this concept as they require a large up–front investment, which is unaffordable to many. That’s why we came up with the solution that we call FairSaaS licensing.

Licensing Options
This is a subscription–based model without the common problems and hassle that come with the traditional SaaS/subscription options. It is paid monthly, so it completely eliminates any upfront investments, and can be cancelled, resumed, upgraded, or downgraded as you go, without any additional penalties.
We are also offering student licenses with massive discounts. More details are provided in a separate article.
Even with a fair price and no large upfront investment, not everyone can afford to purchase extra software. That’s why we keep at least one fully–working version – there are no watermarks, no resolution limits, and yes, you can use it for commercial work! That version is Corona Renderer for 3ds Max Alpha 6, which has been successfully used in many production projects.
The old Alpha version is a capable engine, and may be all that you need – but Corona Renderer has come a long way since that version of course.
Social Responsibility
We want to make a difference to more than just the world of rendering, so we contribute some money from our business to those who are less fortunate. We donate part of our revenue to global and local charities, and our team members help to decide where the money should go.

Powerful Workflow Tools

As former CG artists, we know that the output quality and speed are not the only things that make a great renderer. That is why Corona Renderer comes with many powerful tools to accelerate your workflow that will make you faster as well as your renders!
Extensive Post–Processing, Inside the VFB
Save time (and money) by reducing or even removing the need to use third–party software to carry out post–production work on your renders, thanks to the extensive range of post–processing tools available directly inside the Corona VFB. All of these can be adjusted before, during or after rendering, and settings saved for instant re–use in any scene.
Take a look at how much control you have over your final render with the list of effects below:
A quick example is given below of applying all the above effects to a finished render (although the effects can be applied and adjusted before or during rendering too):
You can also pick objects and set the Depth of Field focus point directly in the VFB, as well as in the docked IR window.
Corona Image Editor
The Corona Image Editor, commonly referred to as the CIE, is a standalone tool for working with your images. Its user interface is inspired by the Corona VFB, sharing its look and feel, and it offers rich and fast post–processing options for Corona EXRs saved from the VFB such as LightMix, full–featured denoising, tone mapping, LUTs, bloom and glare, curves, blur / sharpen, vignette, etc.
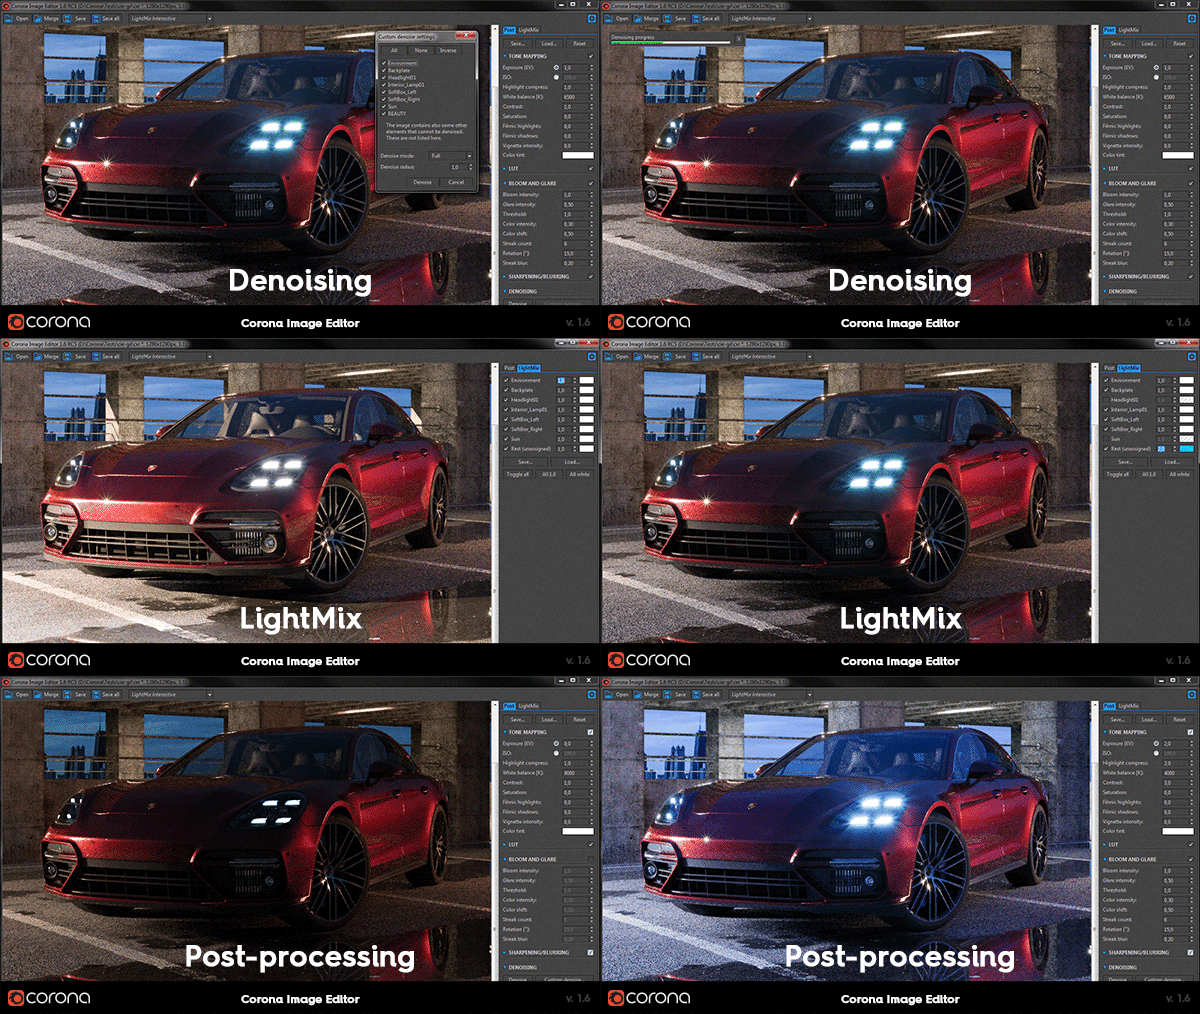
The benefits of the Corona Image Editor are:
Corona Camera

Artists can use a realistic camera model which incorporates all the common parameters, such as f–stop, shutter speed, ISO, sensor width, advanced Bokeh effects, and aperture shape (blades/custom). This allows close matching to live footage.
On top of that, you get access to all the Corona Renderer post–processing options, panorama / VR options, the ability to set focus distance via a static or animated object in the scene, a Fisheye lens projection, and more.
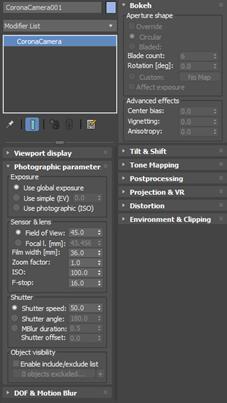
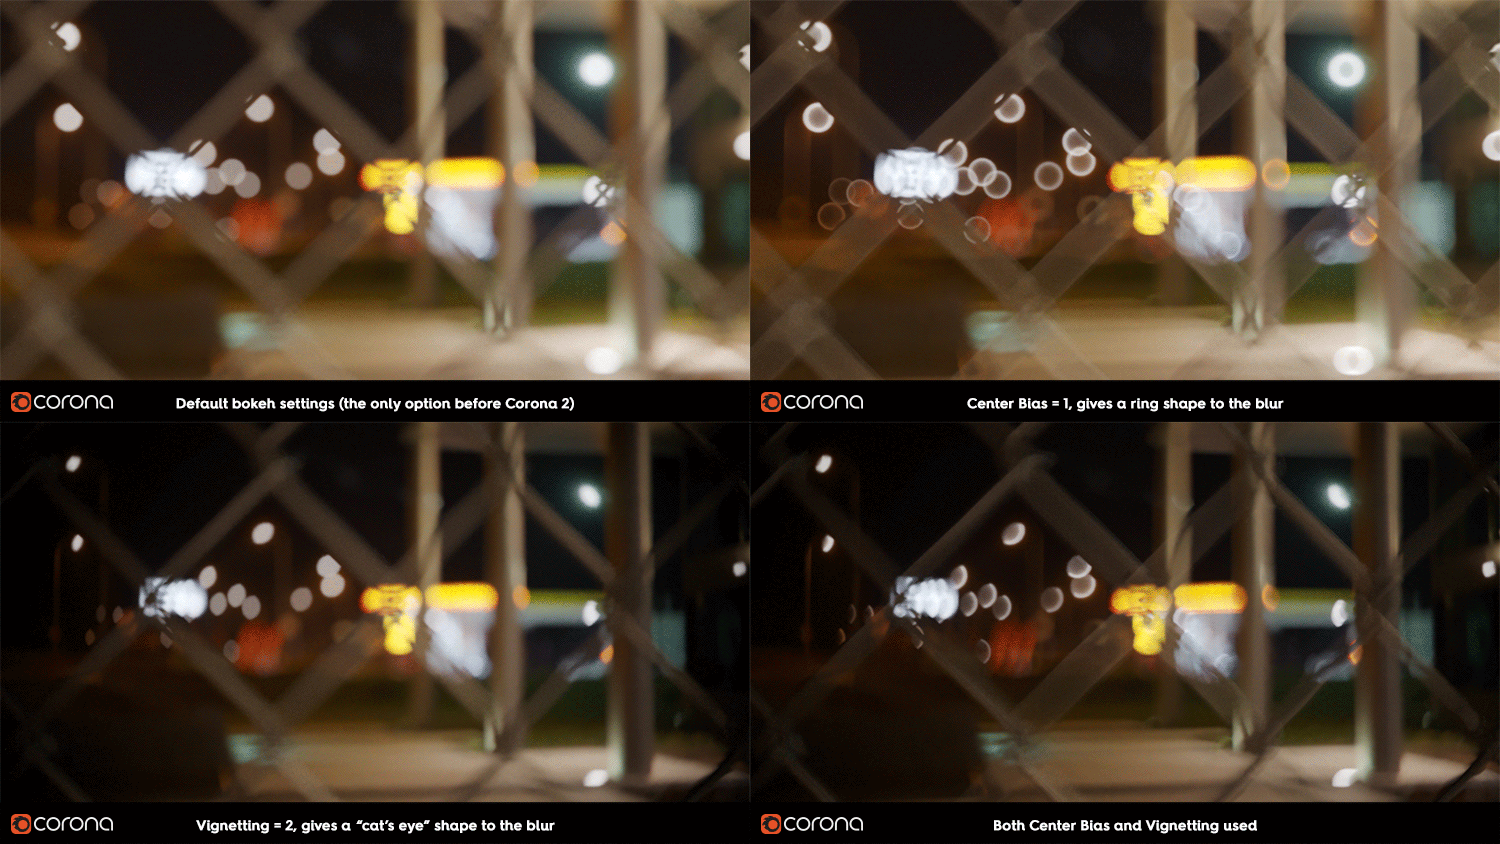
For older scenes, we have maintained the legacy CoronaCameraMod modifier, to ensure any existing scenes will still work as expected.
Corona Scatter
Corona Renderer comes with its own scatter system. Corona Scatter is designed to give a complete solution for distributing millions of high–poly meshes or proxies across geometry surfaces. A typical use is the distribution of vegetation such as grass, forests, etc.
Thanks to Corona Scatter you can create scenes with a virtually unlimited number of objects or polygons, while enjoying the luxury of a low memory footprint and high performance. It contains advanced functions like distributing and scaling objects by a texture map, distributing objects along splines, collision detection, etc.

Corona Unified Lister
The Unified Lister currently lists all Corona Lights and Corona Scatters in the scene, letting you access them and their parameters from one convenient panel.
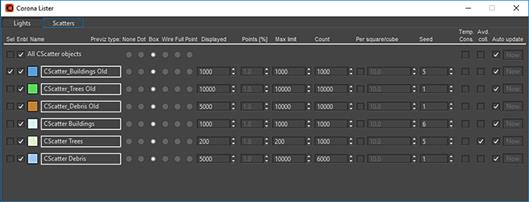
The Unified Lister will be expanded in the next release of Corona Renderer to be the one–stop location for working with all Corona items such as Corona Cameras and Corona Proxies too.
SmartProxy: .cgeo
Corona comes with its own proxy format, .cgeo. The format is cross platform (you will be able to use it in 3ds Max, Cinema 4D, Corona Renderer standalone, or any other future platform). It uses compression, so it is small and fast to save, load, and to upload to renderfarms. Proxy models are always converted to millimeters and properly scaled when loading into scenes that use different units.
The proxy contains human–readable metadata at the beginning of each file, for example the name of the source object and its material, making them friendly to your pipeline.
3ds Max UI Remains Unblocked While Rendering
Ever started a render, then minimized 3ds Max to get at something else on your desktop, only to find you can’t maximize Max again until the render is done? Ever started a render then wanted to check a setting in a different tab in Max, only to find that Max is locked? Those annoyances become a thing of the past, as rendering in Corona does not block the 3ds Max UI!
Built–in Help
The UI has tooltips for most parameters, activated automatically when you hover over the controls. There is also an automatically generated online GUI manual you can consult when you do not have 3ds Max opened.

Smart Masks
Creating masks in Corona Renderer is an easy process. You can create monochromatic as well as RGB masks simply by specifying Object ID, Material ID or by directly picking objects in the scene. You can combine different selections as union or intersection.
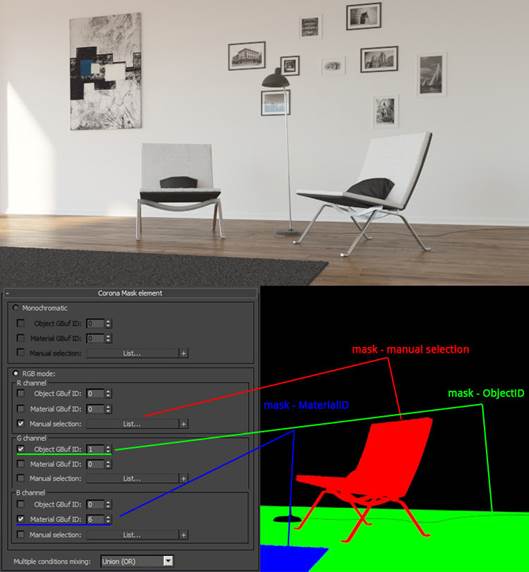
Render Elements Only
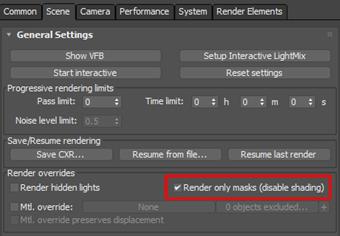
Waiting through a final rendering just to discover that you forgot to set one mask can be very annoying. Usually you would have to create a copy of the scene, turn off lights and GI or set up material overrides to speed things up, and render again. Corona has a better solution: simply set up the missing mask and check the “Render only masks (disable shading)“ option to render only the masks and other render elements without the time–consuming beauty pass.
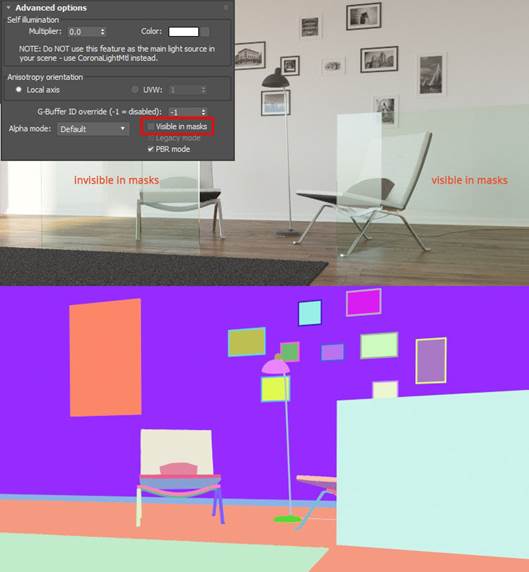
Not Visible in Masks
The Corona Material can be made invisible to masks, while staying visible in the beauty pass. This is a very useful function, for example when you want to create masks for objects behind glass panels.
Resume Rendering
At any point during the rendering process, you can save the contents of the frame buffer into a single .CXR file. This includes all the rendering passes as well. You can then open another scene or even close the application, and later resume the original render right where you left of.
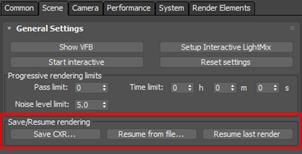
Autosave
With one click you can enable the Autosave function, which will save the rendering progress every few minutes in an .exr file. So if your render or computer crashes, you have the latest progress saved. You can either use the .exr as it is if the render had progressed far enough, or resume the rendering from it if needed.

Flexibility
Corona Renderer is extremely flexible. While we aim for realism, we also understand how important it is to “bend” physical laws to deliver the results your clients expect. To keep your artistry free, Corona supports numerous reality hacks which allow you to get exactly the effect you desire!

Flexible Lights
You can make any light source invisible to the camera, as well as invisible to reflections/refractions. Shadows can be turned on or off, and specific objects can be included/excluded from receiving illumination from any Corona light. Backplates can be easily created with the invisible to GI option. 3ds Max default lights are fully supported.
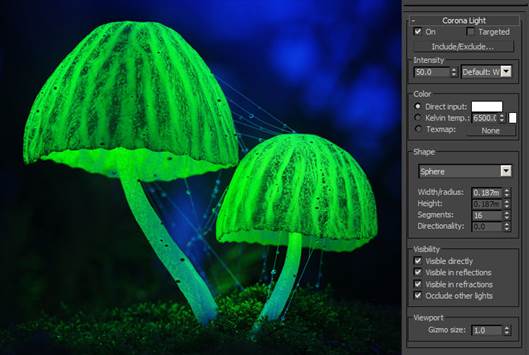
Rayswitcher Material
The Rayswitcher material and texture allow a wide range of artistic tweaks when rendering with Corona. Use them to create materials invisible to camera, to create materials that don’t affect GI, to reduce or increase color bleeding, to have an object show differently when it is reflected vs. viewed directly, and more.
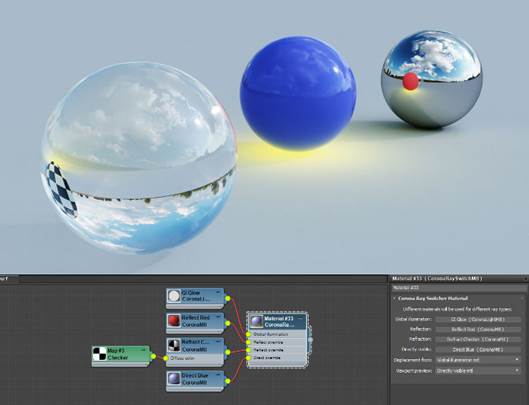
The image above uses a RaySwitch material so that the center ball shows a blue material when viewed directly, emits a yellow glow to GI, is red when viewed in reflections, and has a checkered texture when seen through refraction.
Environment Overrides
You can use different environment maps for reflections, refractions and direct visibility from the camera. For example, you can use a clear sky HDRI as a light source and a second cloudy HDRI just for reflections and refractions.
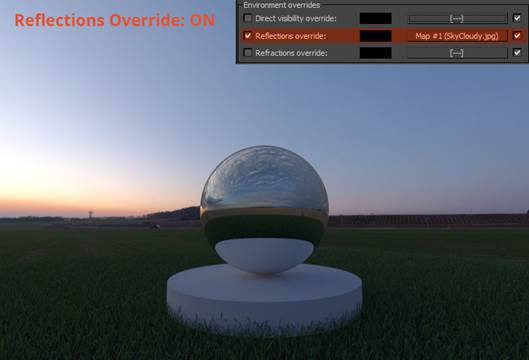
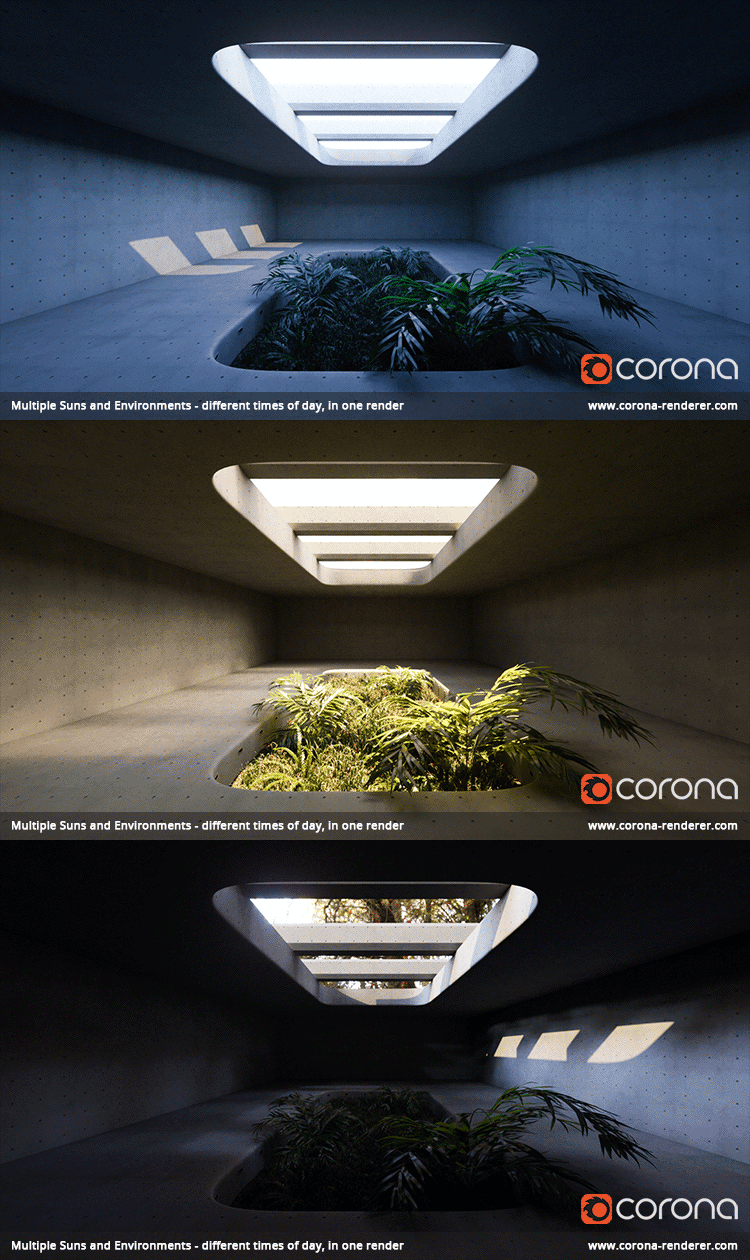
You can also add multiple environment maps and multiple suns, so that you get different times of day in just one render. You can then use LightMix either in the VFB or in the Corona Image Editor to adjust and save those different times of day, all without re-rendering. Read more about LightMix and all it has to offer.
Shadow Catcher
Corona implements its own shadow catcher (matte/shadow) solution. It is a single material with all the necessary controls in one place – there is no need to combine special materials with other special texmaps. It works especially well with our interactive rendering for rapid camera and illumination matching. Advanced features, such as light illuminators and matte bump mapping, are of course supported.

VR Support
Using a Corona Camera, you can export images in Spherical or Cubemap format ready for viewing in a wide range of VR applications.
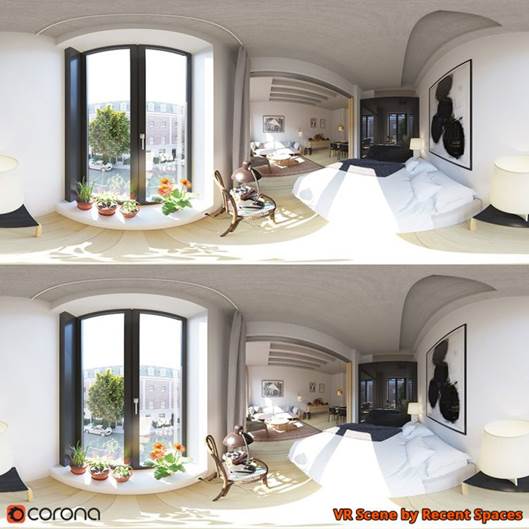
While stereoscopic and panoramic images can be used in any VR software of your choice, there is especially close integration with theViewer from theConstruct, allowing you to create and manage your warp points in 3ds Max without the need for an external editor.
Lights
It’s time to explore the individual aspects of Corona, and we’ll start where it all begins, with lights. The whole process of creating lights is designed to give artists complete control over their scene, while being fast and intuitive.
No Sampling Parameters
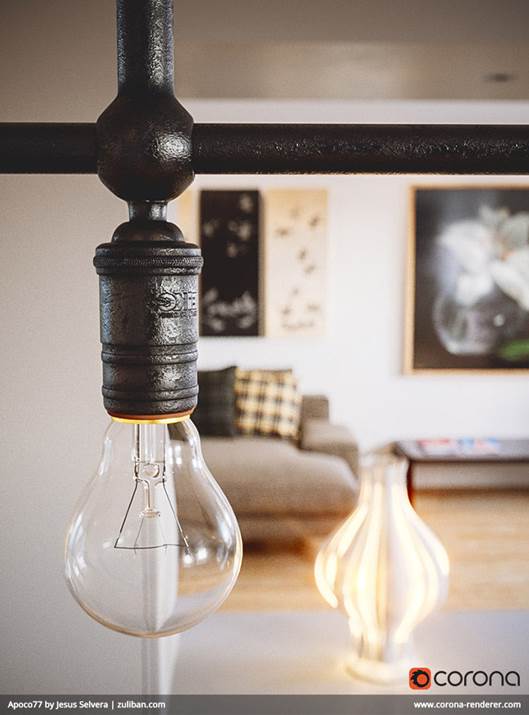
There are no sampling parameters that you would have to set by trial and error. Lights will always work as expected.
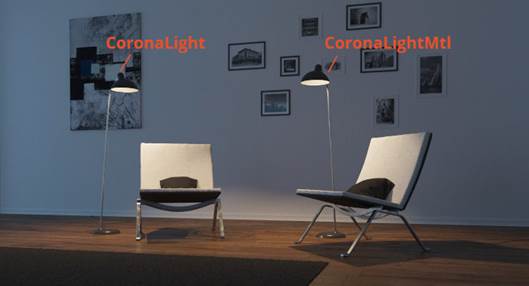
Corona Lights and Corona Light Material
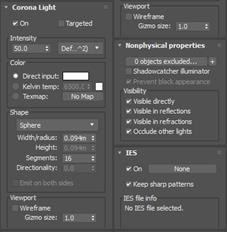
There is no difference in behavior between a Corona Light object and a geometry object with the Corona Light Material applied – both of them have almost the same options and deliver the same results, so it is up to the artist to use what is more convenient!
Lights and Rendering Speed
In Corona, there is very little penalty for using mesh lights which have a high polycount. They will perform as well as low–poly ones with the same shape. Also, directional and IES lights render almost as fast as regular diffuse lights.
No More Dome Lights for HDRI
There’s no need to set up an object to act as a dome light for HDR image–based rendering – just put your HDRI into the 3D software’s environment and you are done! There is also no need to put downsampled / blurred versions of the map into a GI override slot – HDRIs in Corona always work fast and without splotches, regardless of resolution or complexity.
Corona Sun and Sky System
Corona Renderer was the first production render engine to implement the most accurate sky system available today – the Hošek-Wilkie sky. It is currently selected as the default whenever sun and sky is used, so adding those to your scene will get you instant realistic daylight.
Interactive LightMix
With just a single click, you can set up the Interactive LightMix, a feature unique to Corona Renderer that lets you change the color and intensity of lights during or after rendering.
As well as adjusting the color and intensity of each Light Select layer, you can also set up your scene to have multiple suns and multiple environment maps. This lets you render different times of day, with the sun at different angles in the sky, all in just one render. You can then adjust those after rendering in the VFB or in the Corona Image Editor.
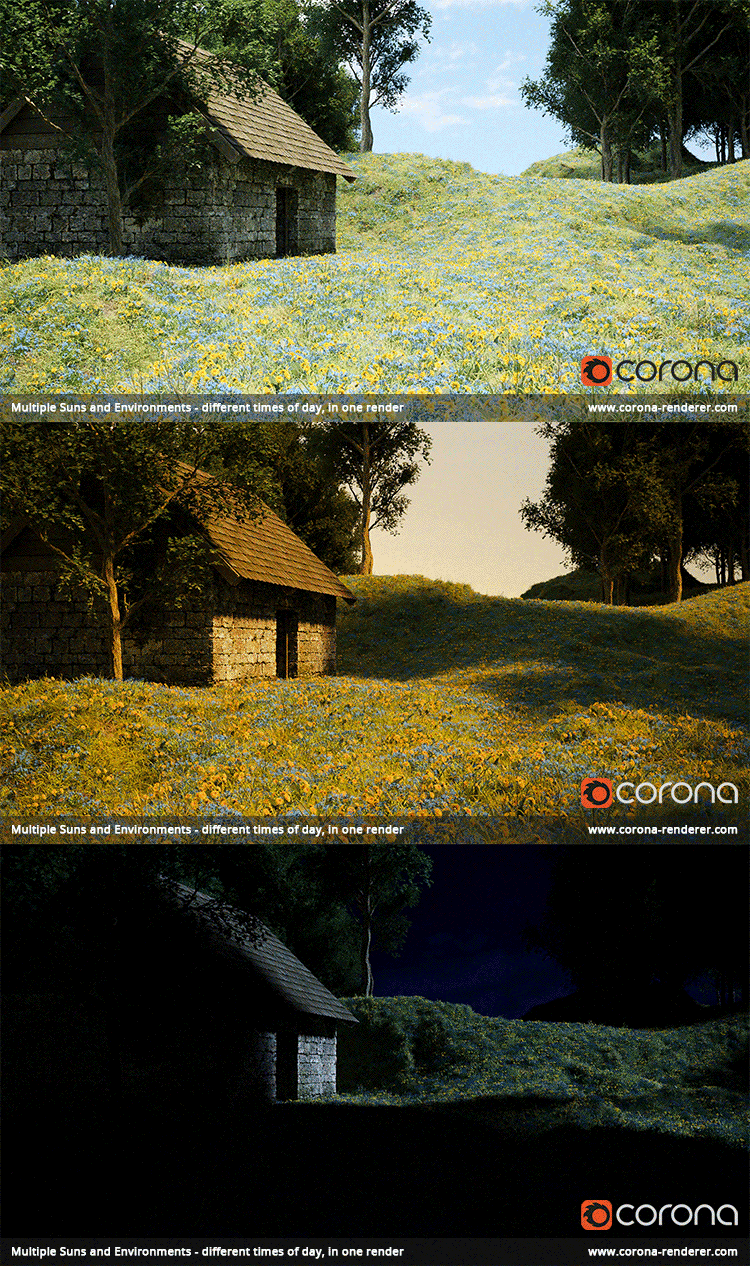
You can save your LightMix setups for reuse from any camera or viewpoint within the scene, so you can instantly reuse those light setups in different renders from the same scene. LightMix is your answer to getting a daytime scene, a nighttime scene, different lights turned on and off, and more - all in one render.
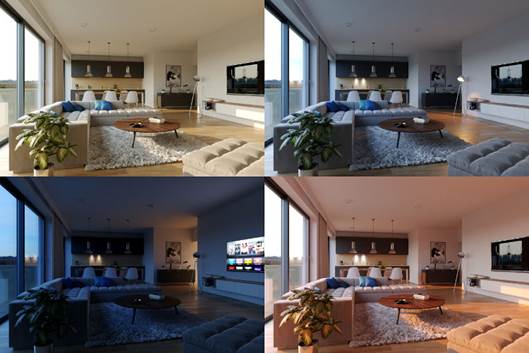
You can also save the separate light passes for compositing or animating later in post-production, which means a single frame can be turned into an animation where the lighting changes.
Materials
The Corona Material
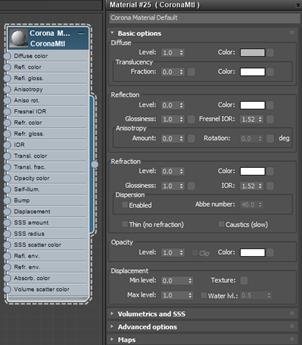
Our design goal for Corona materials is to make them physically based, yet intuitive, flexible, and easy to set up, without having to tweak unnecessary sampling values and other confusing parameters. You also won’t have to choose between 10 or 20 different material types, you can pretty much do it all using the single Corona Material.
GGX & PBR Workflow
Corona Renderer uses the GGX microfacet model to deliver realistic–looking metals and other glossy materials. Our implementation of the GGX model fully conforms to the industry standard physically–based rendering (PBR) workflow. This model produces much more plausible results compared to legacy models such as Blinn, Phong, or Ward. Because of our state–of–the–art implementation, using this model does not incur any speed penalty unlike in other microfacet models.

The materials also allow for easy import from third–party applications such as Allegorithmic’s Substance tools, and Quixel’s Megascans.
Material Library
The new Material Library provides more than 430 ready to use materials, each with a high quality preview. The library includes easy to use functionality such as:
There's also our resources section which contains more high–quality materials from well–known artists and companies. All these materials from the Material Library and the resource section are a great way to get started with Corona!
Material Preview
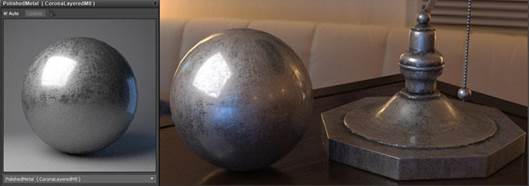
Material previewing uses the same rendering engine as the final frame rendering. The default 3ds Max material preview scene is replaced with a custom, more representative Corona scene, so you get a genuine “What You See Is What You Get” material editor. The example below shows the material preview on the left, and the material in a rendered scene on the right:
Volumetrics and Subsurface Scattering
Corona Renderer also features a powerful approach to Volumetrics and Subsurface Scattering.
Fully Ray Traced Solution
Historically, there were many algorithms for volumetric rendering, most of which relied on interpolation, fakes, and heavy bias to compute the result. Fortunately with modern CPUs in combination with our research, we have been able to ditch all of these outdated options and go straight for the most accurate, 100% ray traced solution. Even we were surprised by how fast the unbiased, un–interpolated solution could be!
Dedicated Skin Shader
Skin is one of the most complex materials to render, with many unique properties that cannot be covered in an all–purpose shader. The new CoronaSkinMtl shader makes it easy to control and adjust the look of the skin, and renders fast and efficiently with realistic results.
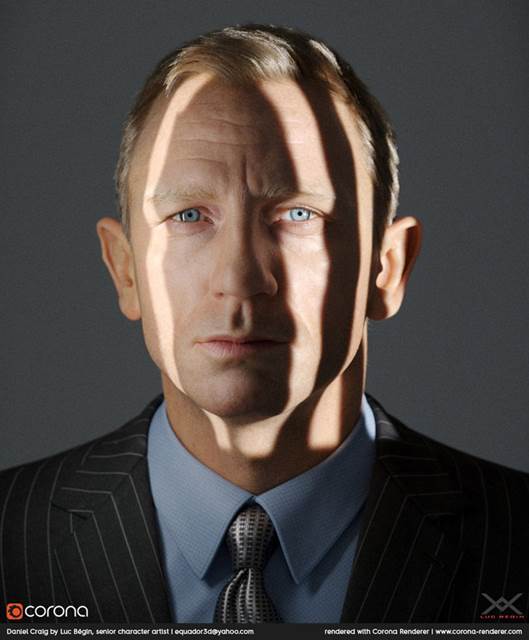
Even if you have never tried rendering realistic skin before, you’ll find it easy to use and will get great results with the default settings.
Simple Setup for general SSS materials
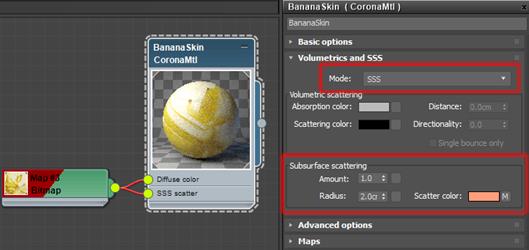
Setting up volumetric scattering or SSS is often especially challenging, but Corona Renderer’s implementation in the all–purpose Corona Material makes it simple. It doesn’t need any sampling controls, as all sampling is done automatically. This makes its UI extremely simple: just set up the scattering and absorption properties for Volumetric mode (for liquids, glass, clouds, etc.) or the Amount, Radius and Scatter color for SSS mode (for skin, wax, food, etc.), and press “Render”.
True 3D volume materials with “Inside Volume” mode
The Corona Volume Material offers an “Inside Volume” mode for true 3D volumetric materials. For example, by using a 3D noise map, you can have fog that varies in density in true 3D throughout the scene. Combined with the Corona Distance map, the possibilities are endless!
The example below compares the “On Surface” mode with the “Inside Volume” mode:
Fire, smoke, water and more
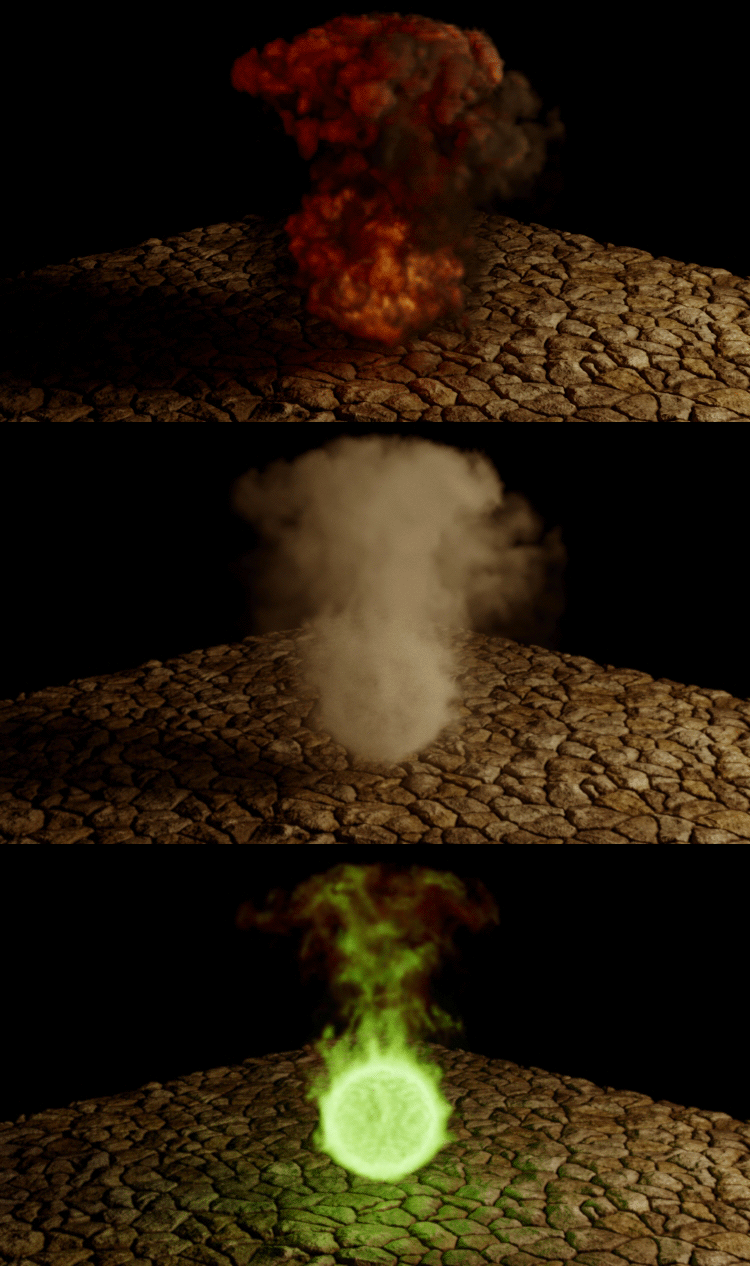
Corona Renderer is compatible with most features of simulation software such as Phoenix FD and FumeFX, letting you use those applications directly inside 3ds Max – for example, a Phoenix FD explosion is shown below:

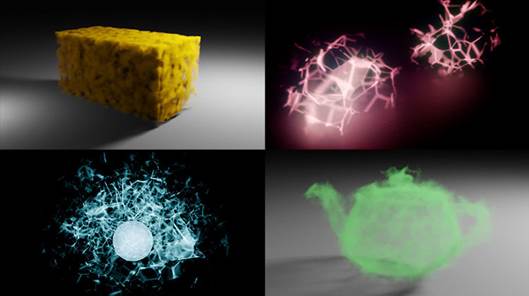
You can also load and render the industry–standard OpenVDB format using the Corona Volume Grid object, allowing you to work with the results of simulations exported from Blender, Houdini, Phoenix FD, and more. The material settings in the Corona Volume Grid lets you achieve a range of different looks and effects, even from the same OpenVDB data:
Dedicated Hair Shader
You can’t have a great skin shader without also having a great hair shader! Corona Renderer’s dedicated hair shader keeps with our philosophy of delivering physical realistic results, fast rendering, and a simple UI. Once again, even if you have never rendered hair or fur before, you will get great results even from the defaults.

Corona Renderer also supports native 3ds Max hair and fur, and Ornatrix and Hair Farm, so that the Hair shader will work for you, whatever plugin you use.
Dispersion
Some refractive materials bend light by a different amount depending on the wavelength of the light. This is called dispersion and creates a rainbow effect in the refracted light. Dispersion can be enabled in the standard Corona Material, and is controlled by the single Abbe number parameter. Enabling it adds realism to gemstones, glass, liquids and other materials. Dispersion also works with Caustics.
Bump Converter
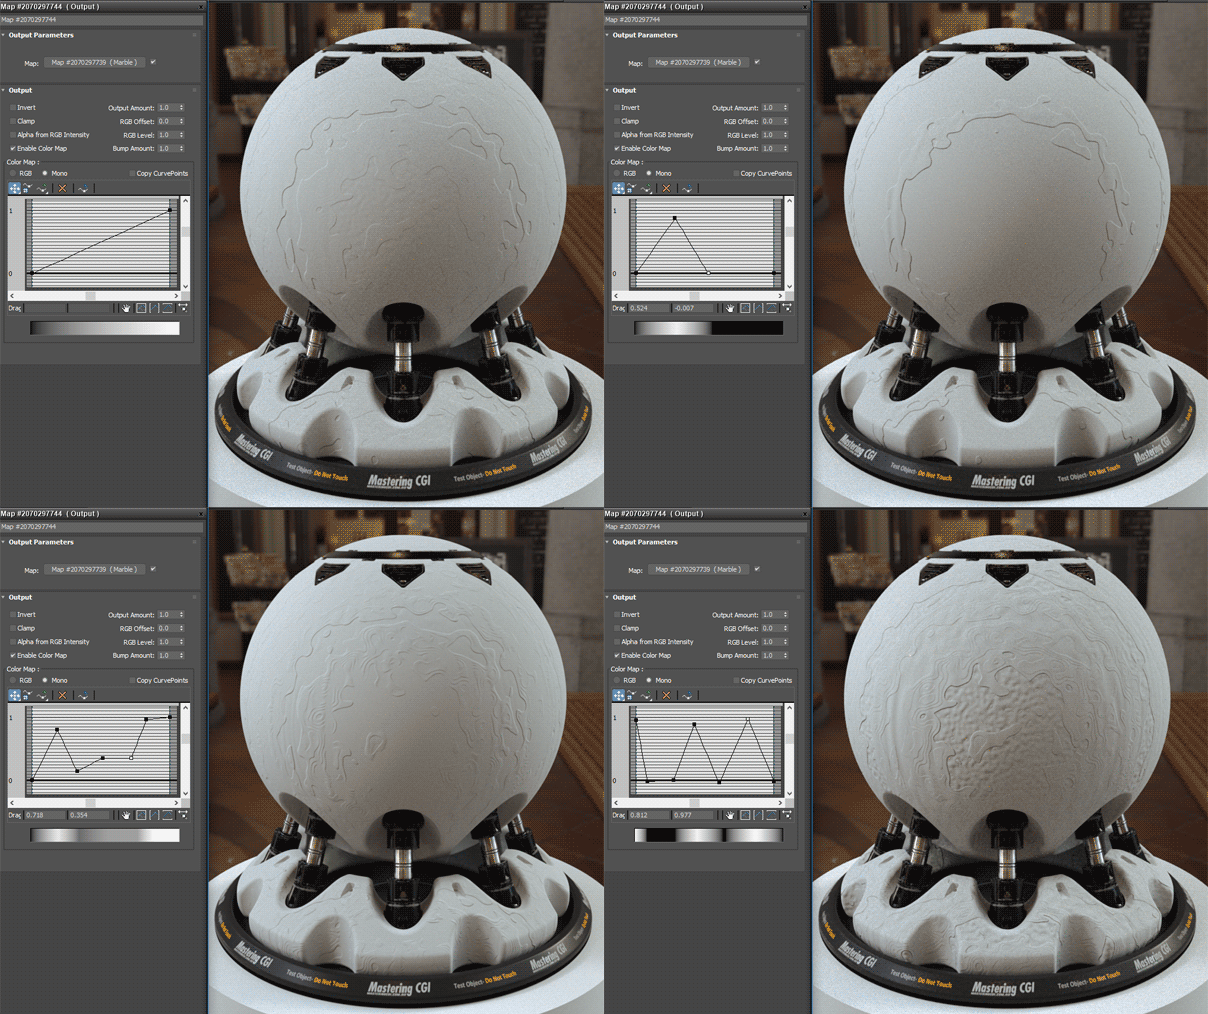
By default, 3ds Max treats bump maps differently, so that some maps do not work as inputs to bump mapping. The Corona Bump Converter resolves this, allowing you to use any map as an input to the bump map channel in a shader. It also lets you use the 3ds Max native Output to apply adjustments to your bump map and get the results you would expect.
Many Maps to Choose From
Corona Renderer comes with many useful maps that you will soon find indispensable, such as Ambient Occlusion, UVW randomization, Multimap, Triplanar mapping, and more. We’ll take a look at just one here, the Corona Distance map.
This flexible map can be used with Corona Scatter to easily achieve effects like keeping paths, roads, etc clear of plants and trees, and can also be used for creative effects such as adjusting materials based on distance to place ripples around an object in water, to cause objects to start glowing as they move close to each other, and more – it really is only limited by your creativity!
In the example below, the ground (with water included) and log were brought over from Quixel Megascans. The “Corona Distance map disabled” image looks a little unnatural, as the water appears completely still.
By using the Corona Distance Map to add extra displacement around the log, blended with the original displacement from Megascans, we can give the effect of ripples specifically around the log. Best of all, since this is procedural, if you move, scale or rotate the log object in the scene, the displacement effect will update automatically.
Material Overrides
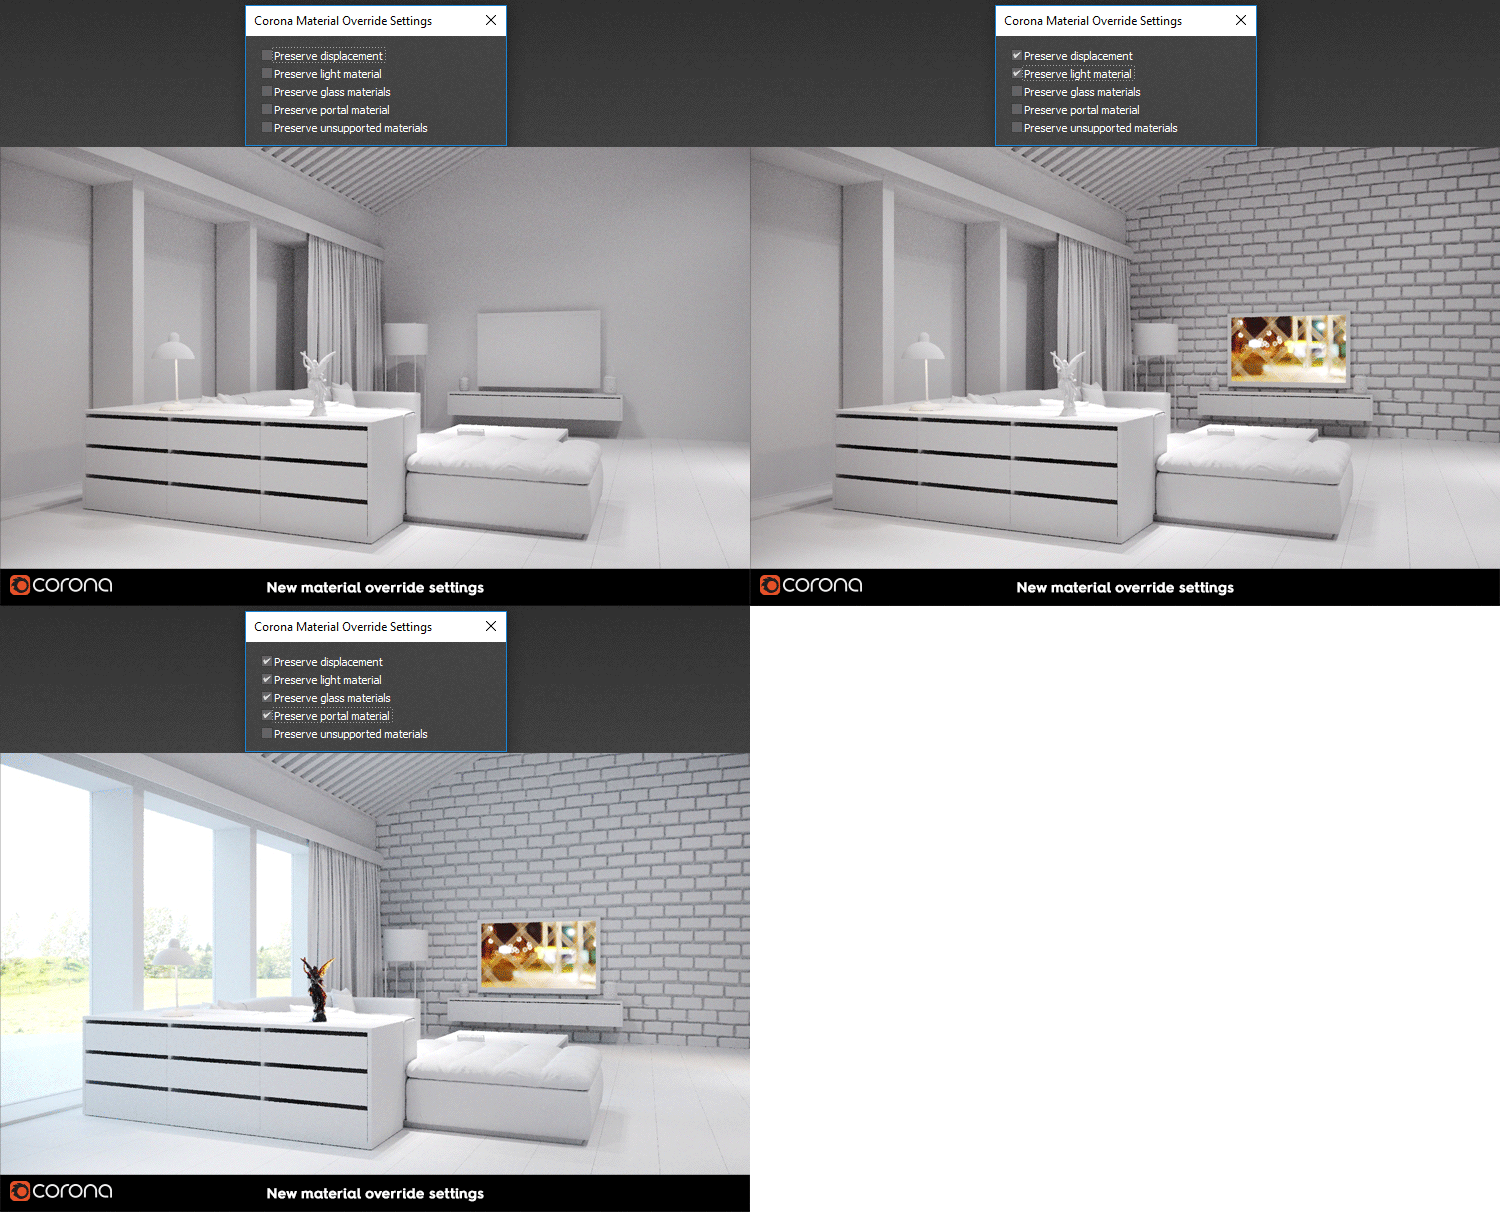
For quick tests, or even for debugging a scene, it can be useful to override the materials with one simple material. This is easy to set up in Corona, with options that let you leave some materials (such as portals, glass, or light materials) unaffected by the override.
Distributed Rendering
Rendering with multiple computers is made simple by Corona Renderer. It has its own distributed rendering system, and is also compatible with 3ds Max’s native Backburner and Thinkbox’s Deadline render farm management systems. Any purchased Corona Renderer license (other than a Student License) includes a minimum of three additional render nodes, so you can leverage multiple computers that you own to reduce render times.
Corona is also supported on a number of commercial render farms.

Auto Discovery of Render Slaves
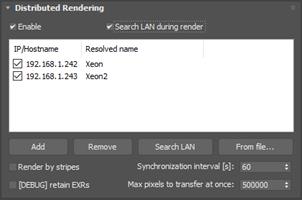
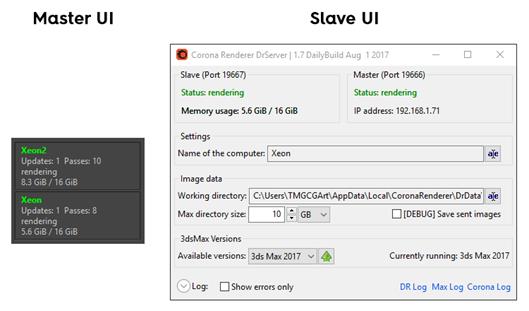
Setting up Corona Renderer’s distributed rendering (DR) is easy. Just make sure all render nodes have Backburner and Corona DR server installed on them. The search process is automatic and Corona Renderer can even search for render nodes during rendering – render nodes will connect and disconnect automatically as you turn the computers on or off, without stopping the render!
Slaves Automatically Gather Missing Assets
When using Corona DR, you don’t have to give a second thought to where your assets are located – slaves will automatically gather models and textures before rendering.
Fast and Simple
3ds Max is spawned immediately on slaves after the DR server starts, letting them begin rendering much faster. Corona DR works with adaptivity, respect VFB render regions, while the UI keeps you informed of the status of all the slaves, how much memory they are using, and how many passes they have contributed to the current render.
Proudly CPU Based
Corona Renderer does not need any special hardware to run. It uses the CPU and you can run it on any processor from Intel or AMD released in the past decade.
Why Only CPU?
By rendering only on the CPU we avoid all bottlenecks, problems, and limitations of GPU rendering, which include the unsuitability of GPU architectures for full GI, limited memory, limited support for third party plugins and maps, unpredictability, the need for specialist knowledge or hardware to add nodes, high cost, high heat and noise, and limited availability of render farms. Read our in-depth look at the advantages of CPU-based rendering.
Using GPUs for What They Are Actually Good At
We’re not anti–GPU in any way, we just believe in using them for what they are good at! In the future, you will see the GPU put to use by Corona Renderer, but in the areas in which the architecture excels. This will be in things like post–processing, e.g. bloom & glare, where the predictable, self–similar nature of each calculation can be shared between the processors in an efficient and effective way.
It Doesn’t Have to be Either / Or
There’s no doubt that both GPU and CPU approaches have their advantages and disadvantages, which is why we still see strong products on both sides being developed and used for commercial work.
While completely switching to only a GPU–based solution is just not worth the risk at the moment, you and your company don’t have to be on just one side or the other – with Corona’s pricing options, you can always have a CPU–based approach at your disposal to use based on the needs of each project, whether or not you also have a GPU–based alternative in your pipeline.
And in the Future…
We are always watching and researching existing and upcoming technologies whether that is CPU, GPU or other coprocessors. If things change with the hardware, we won’t rule out changes to the software – but right now, and for the foreseeable future, the hardware just is not at that point.
Intel Embree Ray Tracing Kernels
Corona Renderer uses the Intel Embree ray tracing kernels, the fastest CPU ray tracing primitives on the market. Since they mesh well with the Corona architecture, they are an important factor in its performance.

© Copyright 2000-2025 COGITO SOFTWARE CO.,LTD. All rights reserved. 京ICP备09015132号-52