General UI Layout
iPi Recorder's user interface consists of several views which are used to perform different activities. The most important views include:
Home. Starting screen which provides access to all functions of the program.
Setup. Adjust device settings before recording.
Background. Evaluate background before recording.
Record. Set recording options and start recording.
Recording. Displays recording statistics.
Play. Playback of iPiVideo files.
Edit. Editing of iPiVideo files and export to AVI format.
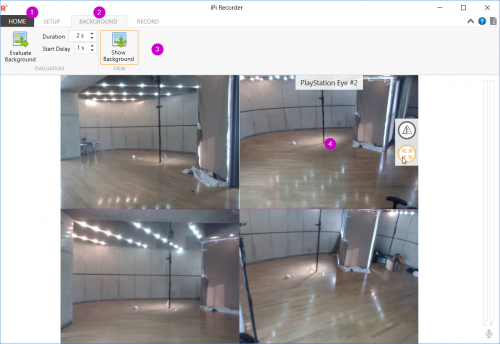
You can switch between views by executing specific commands, like opening recent video from the Home view, or using the tabs at the top (2) when there are several related views like Setup, Background and Record. Most of the views allow you to return to the starting screen by pressing the Home button (1) at the top-left.
Below tabs there is a ribbon, or a big toolbar (3) that contains commands and settings relevant to the current view. The ribbon can be collapsed to make more room for view contents.
Many views contain a grid of screens, each displaying data from an individual device. For instance, video frames from a camera or 3D orientation of motion controller. When you hover over a device screen with a mouse, some controls and information specific to this device are displayed in an overlay (4). For example, a button to display this device screen in a full screen mode.
Home View
You start on the Home view each time you run iPi Recorder.
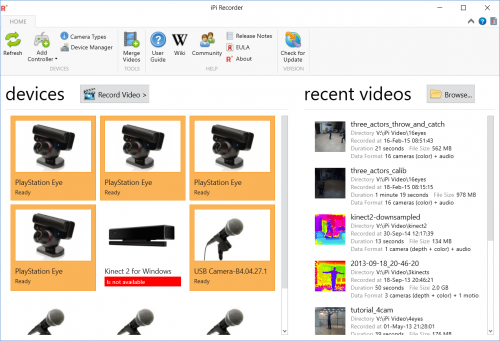
Most part of the view is occupied by a list of devices available for recording. This includes color cameras, depth sensors, motion controllers and microphones (audio sources). Each device has status string below its model name, and normally it is Ready. If there is a problem with specific device, its status contains error description and has red background.
Note: This list contains local devices only. When recording with several PCs, they are connected in the Record view. See Distributed Recording for details.
DEVICES group in the ribbon contains commands related to this list:
Refresh allows the program to discover newly connected devices without restarting.
Add Controller makes a connection between motion controllers and PC.
Camera Types shows whether specific camera types are supported on this system, and what should be done to add this support.
To begin with recording, select devices to use by clicking on items in the list. Selected items are highlighted with the orange background. When selected all needed devices, press Record Video button. It doesn't start recording immediately, but brings you to views serving the recording workflow.
Note: Be aware that not all devices can be used together. For example, color cameras and depth sensors can't be combined, and you can select only one microphone at a time.
Tip: The program remembers your last selection. Thus, if you have not disconnected devices since the last run, the selection will most probably restore automatically.
On the right there is a list of recently recorded or played videos. Just click on an item to open this video for playback and/or editing. You can also press the Browse button to select a file to open with the file dialog.
Recording Workflow
Setup
Setup view allows to adjust device and screen settings before recording.
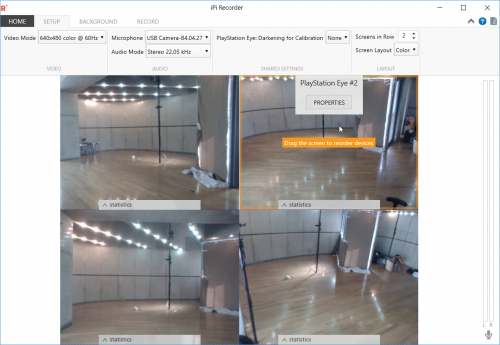
You can:
Select working video mode
Select microphone and audio mode
Adjust number of cameras displayed in a grid row to optimize screen space usage
Reorder devices within a grid. To place a device to a specific position, drag it's screen to this position. You can also throw away unneeded device if it has been selected by mistake, simply by dragging away it's screen.
Tip: For convenience, it is recommended to place cameras in the same order they go around the capture area – either clockwise, or counter-clockwise. However, you're free to use any order you like
Select display layout for depth sensors screens when both depth and color are present.
Set global properties for a group of similar devices, if there are any. Example of such property is Darkening for Calibration for PS Eye cameras. Global properties are found in the Shared Settings group in the ribbon.
Set properties of individual cameras. Examples of such properties include brightness and contrast for color cameras, and elevation angle for Kinects. To access individual device properties, press the Properties button in the device's screen overlay.
Tip: Program remembers settings values and restores them on the next run automatically.
Note: Display settings you are making in the ribbon the device's screen overlay do not affect the recorded video. For example, if you turn on mirroring then image in video won't flip correspondingly. If in depth + color mode you change the layout to display only depth, both depth and color streams will be recorded to a video.
Background
Before you start to record any videos, you'll need to evaluate a scene's background. Background is a picture of static (not moving) objects in the capture area. Evaluated background is embedded inside videos and is used later to detect moving objects easily. Also, background is employed for compressing videos with the background subtraction method.
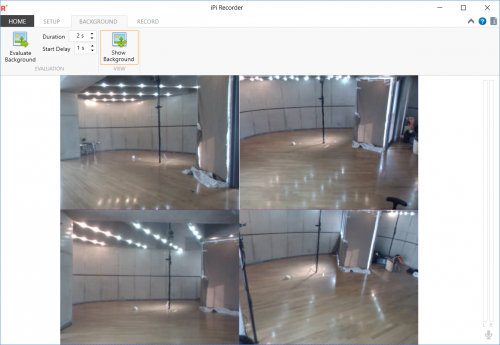
Usually, background should be evaluated only once during a recording session. However, any time the environment gets significant changes, you need to re-evaluate the background. Examples of such changes include differences in lighting conditions, introducing new or moving existing static objects within the cameras' field of view.
Before starting evaluation, you can set its duration. In general, the longer duration, the better evaluated background. Default duration of 5 seconds is sufficient for most situations. Less values can be set for testing purposes, when you trying out different settings for cameras.
PC running iPi Recorder may be located in some camera's field of view. Thus, to evaluate background, you need to go away from computer. But being away, you cannot start the evaluation process. In that case, you can set a delay for evaluation to start. So you'll have enough time to leave capture area after pressing the Evaluate Background button.
After background has been evaluated it is displayed automatically so you can check its quality. You can turn back to live video stream by toggling the Show Background button.
Now you can proceed to Record view.
Record
The most interesting part — recording a video. In short: select destination file, set compression options and hit the Start button to begin recording. When action is over, just press the Stop button and you've got your video file.
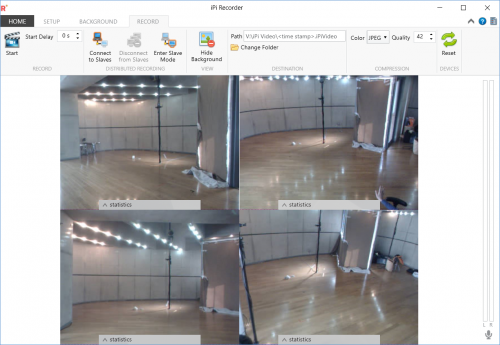
When choosing a destination file name, you can use a special placeholder anywhere in the file name. It allows to make unique file names easily. It is replaced by the current date and time on recording start. The Change Folder button shows up a folder selection dialog leaving entered file name without changes.
Different compression options allow to balance load between CPU and storage (both space and writing speed) in accordance with a system's performance. With depth sensors, compression options are set individually for depth and color images. The following methods are available:
None Uncompressed data. The lowest load of CPU, and the highest load of storage.
Background subtraction Lossless computational-inexpensive compression. Provides compression ratio in the range 2..10 approximately. A trade-off between CPU and storage.
JPEG (for color only) Lossy computational-expensive compression. Provides compression ratio up to 100 and more, depending on value of the Quality setting. The highest load of CPU, and the lowest load of storage.
Note: Use with caution for color cameras. Lossy compression reduces the quality of the image, and may lead to more tracking errors. If you are forced to use it due to limited disk space/speed, leave the quality value at considerably high level. We recommend 70 and more.
As with background evaluation, you have an option to delay the start of recording. So you have time to get off the PC and strike your favorite pose before an action begins.
When the Hide background toggle is on, areas of camera images which are considered the background are filled with green. This allows to make two checks:
How well an actor is distinguished from the background. For instance, if shirt color is close to the color of walls, then an actor may blend with the background and this will spoil tracking.
Whether background has changed substantially and needs to be re-evaluated. Another indication of this fact is a low percentage of background area in camera statistics. It is highlighted with red in this case.
The Refresh button reninitializes all the devices without leaving to the Home view. This helps in case of temporary hardware glitches.
Also, the ribbon contains controls related to distributed recording. Their usage is described in a separate article.
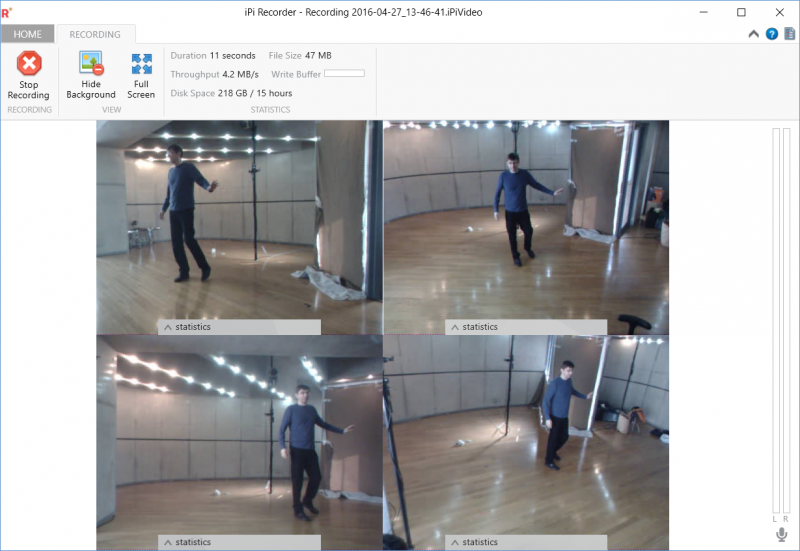
During recording (the Recording view), some statistics are displayed, such as current file size, disk throughput, write buffer usage. Also, you can expand camera statistics to watch for frame drops and related stuff. All those values may help you to discover performance issues. For example, an overflow of the write buffer signals that you have low disk speed — you can try to increase compression ratio. Frame drops (if they appear only during recording) may indicate that your CPU is overloaded and you need to switch to less agressive compression options.
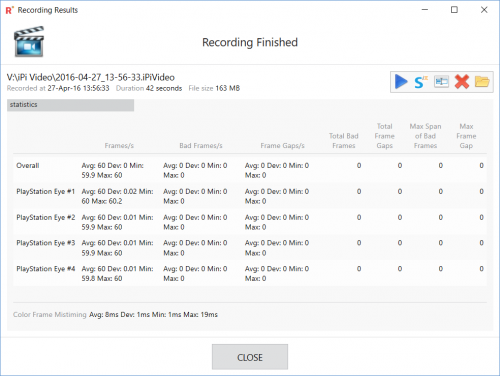
When recording has stopped, a window with recording results is displayed. There you are presented with overall statistics of recording and have buttons to do several common actions with the video: open it in player, open in iPi Mocap Studio, rename or delete the file.
Editing and Export
iPi Recorder is capable of simple editing of recorded .iPiVideo files as well as exporting data to regular media files. To use these features switch to the Edit view when a video is open for playback.
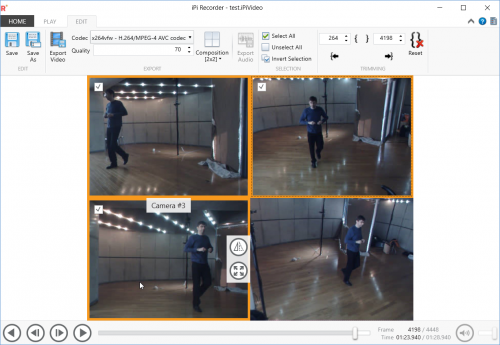
Important! Edit and export features require an active license for iPi Mocap Studio on the same PC. The same limitations on camera configuration are applied as for tracking. For instance, if you have the Basic license, then you can edit/export videos with up to 6 color cameras or up to 2 depth sensors.
Editing is essentially saving a subset of originally recorded data to the same or to another .iPiVideo file. There are two options to define a subset of video data to be used for save/export, which you can use separately or combined:
1. Exclude data from some of the devices. Click on a device screen to select/unselect data from this device. Or use commands in the ribbon to perform group selection operations.
Tip: This option is particularly useful when one of the cameras spoils tracking but you don't want to throw away the whole video. For example, the camera was moved during recording so its position in the scene is not accurate. Or the colors in that camera differ too much from other cameras.
2. Select a range of frames. Use controls in the Trimming group in the ribbon to set range boundaries.
Tip: This option is useful for trimming useless data from both ends of the video. If a video contains multiple takes, it may be convenient to save them into separate .iPiVideo files.
After you have selected the data to use, hit the Save button to replace the original file, or Save As to save the data to another file.
Video export produces an .avi video file from color streams of selected cameras or depth sensors. Besides selecting devices to export (and a frame range if needed) you should take care of a couple of other things:
Video codec used to encode a resulting video. iPi Recorder supports Motion JPEG (built-in), Xvid (if installed, on 32-bit OS only) and x264vfw (if installed).
When multiple screens are selected, choose how they are composed into a single video frame.
Press the Export Video button to select a destination file and run the export.
You can also export audio data only to a .wav audio file.
© Copyright 2000-2025 COGITO SOFTWARE CO.,LTD. All rights reserved. 京ICP备09015132号-52