I am a freelancer, software developer, and 3D hobbyist. Creating landscapes with VUE is one way for me to relax after a hard working day. "Lake In The Mountains" was inspired by a stay in Switzerland.

I am using VUE 2016 Complete.
With my Making Of - I don't want to give an exact recipe to create the model and render of the picture. Instead, I will describe the creation of the model. I encourage everyone to experiment with the model to develop their own results.
Getting Started
STEP ONE
First prepare the camera for rendering. I have defined a format with aspect ratio 3:2 link which is a typical photography format size.
Here is the top view with added world browser.

After the preparation of the primary camera setup the foreground will be created. Create a procedural terrain and open the terrain editor to make changes.
First switch off the "Edges to zero" mode and reset the creation function.
Now open the function editor and add the terrain fractal. To change the result of this function, use the vector 3 seed and link it to the origin of the fractal.
The parameters of the terrain fractal should also be changed - for example, use this parameter setup.

Shrink the size of the terrain to 50-60% of the default size. With setup of Vector 3 Seed the origin of the terrain fractal can be modified to create your own landscape around the lake.

Creating the Lake
STEP ONE
Create a cube, move it into the terrain and resize it so that it is a little larger than the terrain itself.
Place the cube to a get a nice shoreline.
All parts of the foreground are completed. Now add the materials - for the terrain you will need a material with two layers.

With the settings below, the grass appears only where the terrain slope is not too steep. For contrast, a light stone can be chosen as the second level.
The lake is located above the tree line - there are only grass and rocks here.

Now the lake gets its material. Add the default water material to the cube.

Reduce the bump to get a flatter water surface with only small waves. All other parameters should remain the same.

Change the transparency setup. Set fading out to murky - all other parameters will remain the same.

Creating the Background
STEP ONE
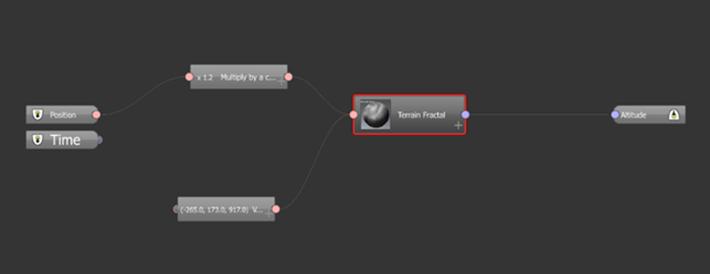
Both mountains are procedural terrains using terrain fractals with active "Edges to zero" mode. For my picture I have adapted the development process of the tutorial with some minimal changes. I want a rockier mountain, so I add a node "Vector 3 Seed" and "Multiply with constant" in the function graph.
An important element is the output node "Roughness". This node will be used to control the snow material. Also important is to give a name to the mountain. You need this to associate the roughness node later in the creation of the material. This is important if you have more than one mountain.
When "Vector 3 Seed" is linked to the input of the terrain, the fractal will be controlled with the layout of the mountain. Here you can make changes to create your mountain as you wish. The 'multiplication with a constant' will make the fractal a little bit faster. Be careful if you change this parameter.

Change the size of factor 5 and make additional modifications to the height of the mountain. Move the mountain into the background to get an overall coherent layout. To get a better view, you can rotate the mountain around the z-axis.
For the material of the mountain start with loading the material, "Grass And Rock 2." For a better contrast against the snow fields, make the color of the rock layer of this material darker by modifying the overall color.

Add the first snow layer and name it "Snow 1" - for example. Modify the presence parameters to show the snow above a defined height and on areas with lower steepness.
Below is an example of the settings for the first snow layer. You can modify the parameters to a get a better look.

Next, add the second snow layer and name it "Snow 2" - for example. First modify the presence settings as shown below, or you can modify the settings for a desired look.

Now emphasize the rocks in the snowy environment. To do this, open the transparency card in the material editor for the second snow layer.
Change the Global transparency to 100% and activate the checkbox for Variable transparency.

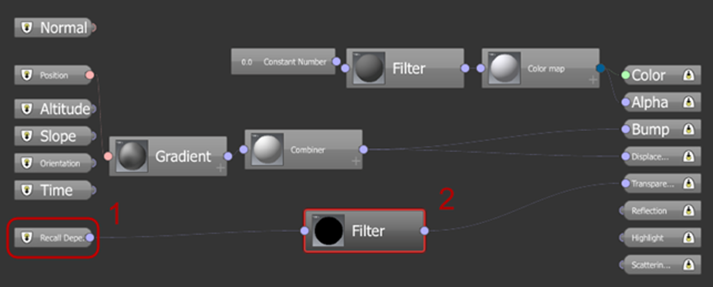
Open the function editor for Transparency production.
(1) Add the input node, "Recall Dependency"
(2) Set your output of roughness from the mountain as dependency.

Add a link to the transparency output and add a filter on this link. With this filter the transparency will be set to 100% on rough areas.
You can modify this filter for a better look.

HINT: My tip for you - If you have completed the first mountain you should save the terrain function and the material. This way you can reproduce all settings for another mountain in this picture or for other works later.
If you create another mountain with all these settings you should note that you must setup the Dependency Recall node in the Transparency production of the second snow layer with the Roughness output node of the terrain function for this mountain. That's why setting a name for the mountain is so important.
Creating an Atmoshpere

STEP ONE
The best way is to modify an atmosphere preset. Because I want to render the picture with the photographic exposure filter, I use the photo metric atmosphere preset "Yosemite." But, this preset is only the base. Something must be modified.
At first, increase the Aerial perspective to give more deepness to the picture.
Then you should modify the sun position to get a good look with light and shadows as you wish.
Render it and switch to photographic exposure filter in post render settings. If needed, you should also reduce the exposure to give more depth to the picture.

Congratulations!
You've completed this Making Of!
© Copyright 2000-2026 COGITO SOFTWARE CO.,LTD. All rights reserved. 京ICP备09015132号-52