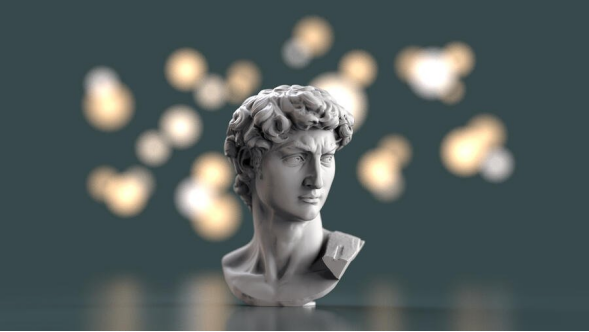

Today we’ll be looking at KeyShot's Depth of Field setting and the background blur effect called bokeh. We'll demonstrate how to set up a standard bokeh appearance, then use this to show how to create custom bokeh appearances using bokeh filters in KeyShot.
If you’re at all familiar with photography, own a camera, or have spent a little too much time browsing photographs, you have undoubtedly come across examples of photos using a dramatic background blur effect that photographers refer to as Bokeh.
Generally, Depth of Field (DOF) is noticeable in portrait or product photography where the subject of the photograph is separated from its background using a low/smaller f-stop, a setting which factors in your focal length and the size of the aperture opening that allows light in. A smaller f-stop causes the foreground subject to appear sharp and visible while the background lights, reflections, and highlights appear out of focus. It is here that the shape of the lens (and the number of blades in its diaphragm) determines how these background elements appear. This appearance is referred to as Bokeh.
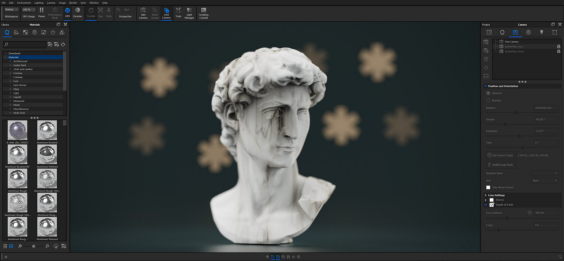
While, traditionally, bokeh appears as a round or hexagonal shape, there are ways to create custom bokeh in any shape you desire. And, since KeyShot functions much like a real camera, recreating a standard or custom Bokeh effect in KeyShot is incredibly easy. Let's take a look at how it's done.
Before we jump in, we would like to give a big shout out to 4KD who shared this process and the results on the KeyShot forum. It's always inspiring to see how KeyShot pros are using the software for a wide array of creative applications. Let's go through the process.
Standard bokeh is the blurred shape of background light sources made by the shape of the aperture. This is typically a circular or polygonal shape, depending on the number of blades in the aperture's diaphragm. This can be achieved in KeyShot using simple light sources and DOF.
Now, to get started, place your model in the foreground of your scene and light it accordingly. At this point, choosing a darker environment may best highlight the Bokeh effect you create. However, if you need a daytime or brightly lit scene, a bokeh effect is still achieved with the same process.
Now, to make a simple, circular bokeh effect, first add a sphere by selecting Edit, Add Geometry, Sphere. Then, position the sphere behind the model in the scene but still visible and apply an Emissive light material to it. In the example, we're using a warm emissive light since most we want a warmer tone.
Next, go to the Project window, Camera tab and enable Depth of Field to both dial in how much f-stop, Focus Distance, and determine if the position of the sphere needs adjusted. If you find that there isn’t enough focus differentiation between your subject and the background light, simply move your lit geometry further away from the subject in the foreground. Once you’re happy with the effect the depth of field is creating, it’s now time to put your creativity to work.
At this point, duplicate the same sphere and position them as desired. While you do this, you may adjust each sphere's scale, or the light's intensity and color to both add some variety to the scene and give the scene more depth.
There, up to this point you have a standard, circular bokeh, a highly flexible method in KeyShot to create bokeh of different shapes and sizes using KeyShot's default geometry but what if you want bokeh with custom shapes? This requires the use of a bokeh filter.
In real-world photography, bokeh filters are typically applied over the cameras lens which changes the shape that light passes through before it gets to the aperture. Since KeyShot function like a real-world camera, you can us it to achieve the same effect by adding a bokeh filter in front of your camera.
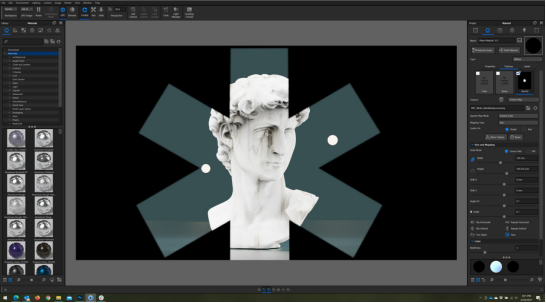
To create a digital bokeh filter, you’ll create a simple image of a shape. Using a graphics program, like Photoshop or GIMP, create a black background and add the shape as a white silhouette. The shape can be added using the text tool or as a .png with transparent background. It should look similar to the image you see below.

This can be any shape you like. Next, add a plane in KeyShot (Edit, Add Geometry, Plane or Ctrl/Option + 5) and position the plane in front of your camera. To help adjust the plane, use the Geometry View (Window, Geometry View or O-key). It provides another view to help position the bokeh filter while also seeing the effect in the Real-time View.
Now, double-click the plane to activate the Project, Material tab and select the Textures sub-tab. Locate your shape image, then drag-and-drop it onto the Opacity texture slot to load the shape as an opacity map. Change the Opacity Map Mode to Inverse Color, and make sure to deselect Repeat Vertical, Repeat Horizontal and Two Sided mapping options. (View settings below.) This will position the shape, now seen as a cutout, directly In the center of the plane. Now, we have our bokeh filter!

At this point, you’ll want to adjust the plane and camera so that your filter expands beyond the edges of the Real-time View - this can depend on shape but generally, the shape should be approximately one-fifth larger than the Real-time View height. If not already, enable Depth of Field for the camera to generate the bokeh effect.
Once you have everything set up and the Depth of Field dialed in, you may notice that the scene has a heavy vignette (dark area around the edges) and is overall under exposed. Under the Environment tab in the Settings section, adjust the Exposure and Contrast settings and any HDRI lighting to compensate for the under exposure caused by your new filter. At this point, you should have a properly exposed scene with your custom-shaped bokeh appearing as the scene resolves.

Here are a few things to keep in mind that will help streamline your experience while creating and using bokeh filters in KeyShot.
1. Try a lower f-stop
Don’t be afraid to use low f-stop numbers. Depending on the size of your light source, an f-stop too high can distort the shape of your bokeh effect or leave it with no effect at all, while a lower f-stops (even going below 1 as you're able to do with KeyShot) can display the shape more uniformly.
2. Use fewer light sources
Using too many light sources can cause the bokeh to overlap and blend together, loosing much of their sharpness. Unless this is the look you need, try using fewer light sources.
3. Use a smaller light source with higher intensity
The size and brightness of your light sources will determine how sharp and visible your bokeh effects appear. Using a smaller light source with a higher intensity will create a clearer bokeh effect, and may allow you to use a higher f-stop while reducing the amount you need to adjust environment lighting.
Hopefully this method for creating bokeh in KeyShot will help you on future projects. And remember, literally any shape can be used to create a bokeh effects, so feel free to experiment, explore, and create unique and unexpected compositions. You can learn more about KeyShot Camera settings in the KeyShot Manual.
We would love to see what you create with this tip. Visit the KeyShot Amazing Shots forum to see what others are creating and share your own work. And if you have a suggestion for another tip share it in the comments below.
© Copyright 2000-2026 COGITO SOFTWARE CO.,LTD. All rights reserved. 京ICP备09015132号-52