
RichScene - how does it speed up my work ?
.... and what is the difference between RichScene and RichDirt ?
RichScene checks your scene and adds RichDirt to all materials, doing work that required a lot of mouse clicking before. Think of RichScene as a dirt manager. It is so convenient to have this work done by a plugin. It is much faster - done manually the same process did take hours for larger scenes, and could also (sometimes ...) go wrong, e.g. texture assignments. RichScene is reliable and can undo as well.
RichScene adds multiple effects to the model, like a splashes effect and a streaks effect.
RichScene changes colors and weights of effects - on the full model.
RichScene undoes (remove) effects on a model in a second.
Filter glass and metals, to exclusivly add to walls.
Apply RichDirt to a selection of objects. Add a subtle effect to a white facade. Then select the red roofs to add another type.
Use multiple RichScene to add different dirt to buildings (a brick house, a seventies building, and the newest and best construction ).
Save your best ideas to a material library.

A street block done with RichDirt and RichScene, copyright Thorsten Hartmann (Infinity Vision). A great example for architectural renderings - the subtle addition increases realism a lot.
Non-3dsMax users would even take it for a real photo.
What is your main advantage ?
Because RichScene can work on a selection of objects you even do not have to find each material or texture. RichScene finds the matching materials for you and adds RichDirt.
More - it puts your original texture into the right slot, adds a color tint with a good mixing mode to a 3dsmax Composite node. You save the time to find the materials, to copy the textures, to build a composite node.
Work with an easy interface ! Forget the technical details ! Just choose colors, weights and styles. At the same time keep full flexibility for fine tuning.
How much do I gain ?
Imagine a beautiful scene with just 20 materials. Without RichScene you did need 1 to 10 minutes to add dirt to each material, while clicking fast and concentrated. This isn´t everbodys favourite task. On 20 materials you did need 20 min to 200 minutes for the full scene. Just imagine that - 200 minutes of clicking in a concentrated way - how could you ever think about doing that yourself ? Now RichScene does the same work in 10 seconds .
Imagine you make streaks longer to get a more intense effect, for the whole scene. This took you 3 minutes, on a small scene. RichScene does it in 10 seconds.
Imagine you add a green tint to splashes, and make streaks rusty brown. This took you 6 minutes. RichScene does it in ... 10 seconds.
You massivly gain time for the first setup - and several minutes for every change like colors, weights, mix modes. Working with RichScene is so much faster that it pays off already for the first project.
The more materials you have the bigger the gains are ! On larger scenes with 100 materials you gain up to 10 hours on a single project. Drink a coffee, chat with friends or use the extra time to make your scene even better.
RichScene is automatically installed with RichDirt2 (both trial and commercial)
RichScene Quick Guide
1.After installation look in the material browser, in the standard materials. (RichScene is installed with RichDirt, there is no second installer)
2.RichScene has a golden top, and a gray bottom in the material editor.
3.Open the 'Add to model' rollup.
4.Press 'Add/Update to Diffuse'.
5.Render an image - dirt is everywhere.
6.Tune styles, colors, weights.
7.Press 'Add/Update to Diffuse' again.
8.Render again.
Note: you need real materials on your objects. What would be ´unreal´ materials ? When you create a box, cube, etc 3dsMax assigns a default (wireframe) material. These materials do not allow to attach dirt.
RichScene Documentation
The documentation for every part and parameter of RichScene, including internal details for large studios.
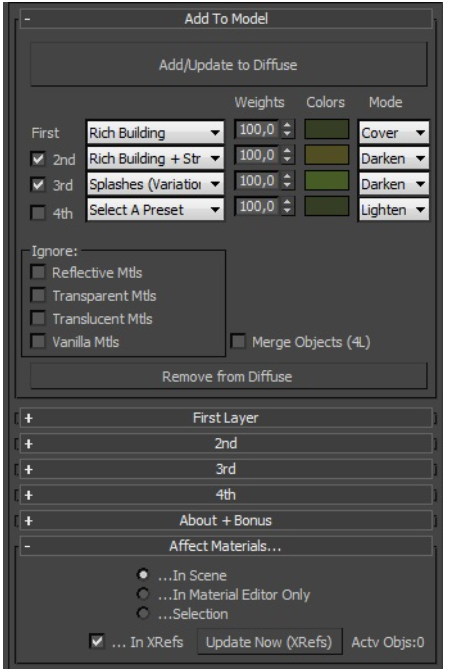
Snapshot of the user interface
RichScene main structure
RichScene creates 4 effects - each effect can use a RichDirt preset (plus later fine tuning). See the parameters in detail below.
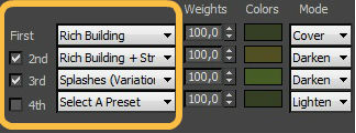
Effects 2,3 and 4 can be switched on / off. Often 3 effects are sufficient. The fourth effect is for your advanced / special cases.
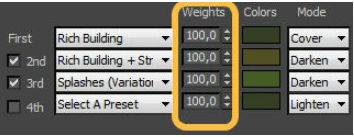
The weights determine how important an effect is. 0 is off - 100 is full intensity.
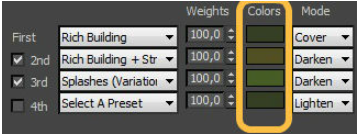
The color of an effect. Use it to add a color tint to dirt. Good examples are a green tint for splashes (moot), or a brown tint for streaks (rust).
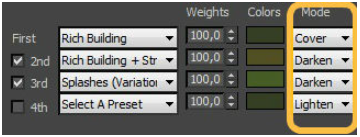
The 'mode' determines how dirt is added to the underlying texture. There are 3 modes. Cover - dirt covers the texture, like a thick layer of paint. Darken - makes the original texture darker, like typical dirt. Lighten - makes the original texture lighter, like streaks of white chalk.
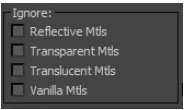
RichScene has 4 locks (Ignore). Use a lock to keep materials unchanged. This is useful to skip glass (transparent), or metal (reflective) so dirt is only added to certain material types. Locks can also be used when removing dirt. For example you could remove dirt just from glass materials.
Can i do Fine Tuning ?
There is a rollup for every effect (layer). For fine tuning each rollup has a nearly full copy of RichDirt parameters available. The names are identical to the RichDirt map plugin. See the RichDirt documentation . RichScene itself uses Tooltips - very often these are sufficient to tell what a parameter does.
What is the best workflow ?
1) First do your regular material assignment and texturing. I.e. start with RichScene when your scene is already textured.
2) Then run RichScene, change effects and colors so you get a good overall effect for your image. The dirt manager allows to make tests with different colors, weights, effects very fast.
3) When you are satisified with the overall look, close RichScene and tweak individual materials, like making dirt stronger in one area, or removing dirt in another area.
Merge Objects
Because the merge objects feature is often good for all 4 layers an extra checkmark is provided to switch it ´on´ everywhere. Good to know - when it is switched off the merge object flags in each rollup have priority.
Affect Materials rollup
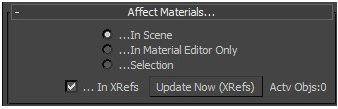
Dirt can affect the ´materials in the scene´, or the ´materials in the material editor only´, or add dirt to the ´Selection´. Select a -part- of a house and RichScene adds dirt to its materials.
A big advantage for professional scenes is that RichScene can add dirt to XRrefs as well. Since XRefs are typically huge it can take a minute to scan all of them. To update the list of XRefs press the ´Update Now (XRefs) ´ button. The number of currently active xref objects is displayed on the right side of the button.
Which material types are supported ?
RichScene supports the material types Architectural, Raytrace, Standard, VRayMaterial, mental ray Arch + Design, MultiSub, Blend.
Bonus rollup
Use ´Convert ...´ to convert RichDirt1 scenes to RichDirt2. The code upgrades the full model. Both RichDirt1 and RichDirt2 must be installed - otherwise 3ds Max will display a warning message. RichDirt1 and RichDirt2 can exist on the same computer, so you can choose when you want to do the conversion. RichDirt2 streaks are better, and look a bit different. For Version 2 ´flat cone´ results are stronger (corners of a flat object are more intense). The conversion script does its best to create very similar results. It is good practice to not switch the version inside an animation.
The ´add object ids adds ids to all objects in the scene. If you already assigned object ids before it does not change these, it only adds ids for ´empty´ objects (id = 0). Object ids are good for RichDirt2 to create different dirt per id.
Installation
RichScene is automatically installed with RichDirt2, to the main plugin directory, which is typically found in C:\Program Files\Autodesk\3ds Max 20XX\plugins. When you use 3ds Max Design this is ..\3ds Max Design 20XX\plugins. As of 2017 Autodesk did remove the seperation into Standard and Design.
When you buy a seperate RichScene license (seperate from RichDirt) copy the plugin to C:\Program Files\Autodesk\3ds Max 20XX\plugins.
Slate Material Editor and RichScene
RichScene works nicely with Slate. Use add change and remove. See all the connections that this creates. 3ds Max as of 2013 can unconnect but not finally remove shaders in Slate. A simple solution is to close slate for a short moment, run the remove from the compact material editor, and continue work in the Slate material editor later.
Technical details
This is information for larger studios that do massive tweaking of scenes. To tweak materials after Dirt had been added it is good to know the structure used by RichScene.
RichScene uses a composite map with 5 layers.
The first layer uses the original diffuse texture (map). If the material didn´t have a texture a RGB_Multiply is used for the main color. The other 4 layers have each a RichDirt texture as ´mask´ and a RGB_Multiply for the color of the effect. RichScene automatically assigns nice names to the layers, and shrinks the layers that are off.
How does RichScene know that it created a layer, so it can be removed later ? Why does the removing (undo) take extra care ? RichScene does many changes to the scene so the redo/undo system of 3ds Max would be under heavy fire. RichScene bypasses this bottleneck by using a clever database that easily can rebuild the original (clean) scene. RichScene checks the composite maps second layer (precisly the mask). If this contains a RichDirt map it knows it had been created by RichScene. It can then remove the full composite map when you press the ´Remove RichDirt from diffuse´ button. The advantage of only checking the second layer is that you are free to exchange anything else in the texture tree, like adding many more layers, or using different texture types.